Honda CRF230F - Carburetor Notes
March 14, 2018 version
| Introduction | Modifications | Big Bore | DIY Notes | Carb Notes | A look back |
|
|
Honda CRF230F - Carburetor NotesMarch 14, 2018 version
|
On this page, I show a few pictures and give a few hints on how to work on the carburetor.
If you find any errors or would like to suggest changes, please let me know.
Click on small pictures to see bigger versions. You may want to print this web page for easy reference.
Contents
Changing the main jet
Changing the needle and/or adjusting the needle clip
Installing an extended fuel screw
Cleaning the carb
Temperature and Altitude Adjustment chart
Jetting part numbers
Fuel screw washer and o-ring
Carb rebuild kits
Detailed carb pictures
A note before you begin. Red Mesa, author of CRF230F Shop Notebook makes reference to JIS screwdrivers:
Not all "Phillips" screws are the same: JIS
Although I mention using Phillips screwdrivers throughout this web page, I recommend using JIS screwdrivers instead.
I came to this realization well after I had written this page; don't make the mistake I made - use JIS.
Changing the main jet
You can change the main jet without removing the carburetor from the motorcycle.
|
Tools you'll need
|
Drain the carb
|
Remove the bottom plug
|
|
|
|
Remove the main jet
|
|
|
|
|
If the main jet comes out attached to a long brass part, don't panic. The long brass part is the needle jet holder. Disconnect the main jet from the needle jet holder using a small crescent wrench and a 6mm socket connected to the 1/4" ratchet. Connect a 7mm socket to the short extension. Using your fingers, use the socket/extension to screw the needle jet holder back into the bottom of the carb until it's snug. Then connect the short extension to the 1/4" ratchet. Use the ratchet to tighten the needle jet holder. Do not over tighten; snug and a bit more is good. |
Install the new main jet
|
|
|
|
Reinstall the bottom cap
|
|
Turn the fuel petcock on and check for leaks. Ride. |
Changing the needle and/or adjusting the needle clip
|
You can change the needle and/or adjust the needle clip without removing the carburetor from the motorcycle. You may have to remove the seat and gas tank. You must be able to get to the top of the carb and remove parts through it. If you can tilt the carb body out from below the gas tank enough to see the entire top of the carb, then you're set. If you are using the stock throttle cable setup with both a pull and push cable, then tilting the carb becomes very difficult because the cables are in the way. If this is the case, remove the seat and tank and begin work. If you are using a non-stock throttle cable setup, such as only one pull cable, then you can remove the single cable and tilt the carb.
In 2008, Honda changed the orientation of the link and link arm, so my procedure will not work on 2008 and newer carbs. |
|
Tools you'll need
|
Note about the special tool: The special tool used for this work is an SW-10 Swinger Hook made by Ullman Devices Corp, Ridgefield, Conn. You may be able to find the tool at your local hardware store. If not, try the web. I ordered several of these tools in 2001 from Kipper Tool for about $5 each (shipping extra). If you can't locate the tool, make a wire hook from number 14 or 16 bare copper wire or similar. A small pair of needle nose pliers will also work. 2013 update - Amazon sells the SW-10 Swinger Hook for about $7. |
Tilt the carb (if you can't tilt the carb, remove the seat and tank instead; see the note above)
|
Use the two 10mm box/open wrenches to loosen the lower nut. Hold the cable housing with one wrench, while you turn the lower nut with the other wrench. Slip the cable out of guide and move it behind the guide, out of the way. |
|
|
Remove the top of the carb
|
|
|
Remove the retaining spring and link
In 2008, Honda changed the orientation of the link and link arm, so my procedure will not work on 2008 and newer carbs.
The more difficult procedure is described in Red Mesa's CRF230F Shop Notebook: Changing the carburetor needle on a 2008 and later model
|
|
|
|
|
|
Remove the slide
|
|
|
Remove the needle
|
|
|
|
NOTE -- I read about an alternate method of removing the needle that reduces the possibility of bending the needle. Using my method described above requires that you hold the slide in one hand while you loosen and unscrew the small screws in the bottom. The screws are often seated very tightly and require significant force while rotating the screwdriver and solid seating of the tip into the screw head. During this process, the cheek of your hand could roll over the edge of the slide and push against the needle, bending it. You may not even notice it, especially if you have large hands as I do. The alternate method is to loosen the screws while the slide is still inside the carb body. There is no possibility of bending the needle with this method. The only problem is, it's difficult to do this with the carb still in the carb boots and rotated. You must steady the carb while you break the screws loose and that's easiest with the carb removed from the boots and in your hand. At least for me. If you can do it with the carb in place, go for it. Otherwise, pop the carb out of the boots. After you change the clip position (described below), install the slide into the carb body before re-installing the screws. Don't over-tighten the screws - you may have to adjust the clip position again. I tighten to snug and a bit more. The lock washers should be an insurance against under-tightening. |
Adjust the clip
|
|
Caution: if you use pliers to remove and replace the clip, you may crimp the clip enough so that it doesn't fit properly on the needle or completely into the needle groove. |
Reinstall the needle
|
|
Screw in the small screws using the Phillips #1 screwdriver. Don't over tighten because you may have to remove them some time in the future; snug and a bit more is good. |
Reinstall the slide
|
|
Reinstall the link and retaining spring
|
|
|
|
Reconnect the link arm
|
|
To help line up the holes for the screw, do two things: 1. Push the throttle drum to the right, towards the carb body. This gets the inner shaft into the correct position. (The throttle drum is the round metal plate on the left that the throttle cables are connected to.) 2. Raise the link arm just a bit. This rotates the outer shaft so the holes in both shafts line up. Look into the screw hole as you do this to see which action aligns the holes best. You can even do both actions at once and when the holes line up, slip the screw into place. After the screw is tightened, rotate the throttle drum to check that the link arm and slide operate correctly. |
Reinstall the top of the carb
|
|
Realign the carb
|
|
If the throttle cable was removed, use the two 10mm box/open wrenches to reinstall it. |
Operate the throttle to make sure that everything works. You should hear a small clunk when the slide hits the bottom of the carb as you roll-off the throttle. Reinstall the tank and seat if they were removed and go riding. |
Installing an extended fuel screw
|
To install an extended fuel screw, you must remove the carburetor from the intake boot and airbox boot, so you can get to the lower front of the carb. You may be able to remove the carb without removing the seat and gas tank, but it's very difficult. I recommend that you remove the seat and tank first. Note: Although I, and many others, call this part a fuel screw, Honda calls it a pilot screw. We use the term fuel screw to distinguish between this part for four strokes and the 2-stroke version, called an air screw. This is done so we can be ever mindful that screwing the "fuel" screw in and out adjusts the amount of "fuel" we are adding to the mix; 'in' is leaner (less fuel), and 'out' is richer (more fuel). |
|
There are three fuel screws that this section is concerned with:
the stock Honda '03-'05 fuel screw (left), |
The head of the shorter '06-and-up fuel screw is recessed in the carb body and is difficult to get to when you want to adjust the fuel screw. Honda has put these shorter D-bit-head fuel screws on many CRF models to comply with CARB, the CA agency that sets emission standards for CA motor vehicles. On newer carbs, the fuel screw chamber has a metal cap that is pressed in to cover the fuel screw and prevent adjustment. On the newest CRF250X carbs, there is a locking pin installed also. By installing an extended fuel screw, you make it easy to adjust the fuel screw by hand. Small tweaks to compensate for temperature swings are easily done using your finger on the T.
You can buy the Kouba extended fuel screw from: |
|
You'll also need a driver for the bit: it's a 1/4" hex drive. I used a short 1/4" hex socket and a manual drive handle. |
If you don't want to buy the D bit, you can try using a small jeweler's screw driver to fit in along the flat edge of the D and try to rotate the stock fuel screw out. A dental pick may also be used. DO NOT drill out the stock fuel screw; you may ruin the carb. |
|
The 2013 and 2014 model carbs have a brass cover over the fuel screw. You can try to remove it with a pair of needle-nose vise-grips or other tool. Another choice is to drill a small hole in it, then thread a screw in, then pull on the screw to remove the cover. You could also put a very small hook in the hole and pull; use the Swinger hook if you have it. If you have an after-market extended fuel screw that you will be installing, you don't have to worry too much about damaging the stock fuel screw hiding under the cap. Caution - don't put any pressure on the fuel screw chamber itself; the cast material is not strong and the chamber can be broken off. Honda does not sell individual carb body parts - if you break the chamber off, you have to buy a whole new carb! I have not seen but have read that 2015 and newer carb models have a pin installed further blocking removal of the fuel screw. See Changing the needle and/or adjusting the needle clip for a description of the Swinger hook. |
|
Tools you'll need
|
Drain the carb
|
Remove the carb from the intake boot and airbox boot.
|
|
|
|
|
|
|
|
|
Remove the stock fuel screw.
|
If you have an '06 and up 230F and don't have the D bit and are using some other tool, this will be difficult to do. You can bypass this step, but then you will have to do the "hot" adjustment described below. |
In this picture, we are using a toothpick to dislodge the washer and o-ring that remained in the carb after the stock fuel screw was removed. |
Install the extended fuel screw.
|
|
Install the spring, small washer, and tiny o-ring on the extended fuel screw. |
|
|
Using your fingers, screw the fuel screw in until it bottoms lightly.
Then, unscrew the extended fuel screw the same number of turns that the stock fuel screw was set at. This is the number you were supposed to write down in the step where you removed the stock fuel screw. If you don't have this number, set the fuel screw to 1 1/2 turns out and do the "hot" adjustment described below. |
Reinstall the carb.
|
|
|
Put the ends of the vent hose and drain hose into their respective frame tabs. Operate the throttle to make sure that everything works. You should hear a small clunk when the slide hits the bottom of the carb as you roll-off the throttle. Reinstall the tank and seat if they were removed and go riding. |
Hot-adjust the extended fuel screw.
|
Start the engine and let it warm up for a few minutes. Ride the bike a few hundred yards to ensure that the engine is warm. Using your fingers, screw the extended fuel screw in until the engine stumbles. If you bottom the fuel screw, and there is no stumble, the pilot jet is too rich; install one size leaner pilot jet and start over. |
Now, turn the fuel screw out until the engine runs the smoothest and highest rpm. You may have to hunt back and forth to find the sweet spot. Turn 1/8 turn at a time and let the engine run for 30-60 seconds to settle in at the new jetting. Once you find the sweet spot, stop the engine. If you unscrewed more than 2 1/2 turns, the pilot jet is too lean; install one size richer pilot jet and start over. |
With the engine off, screw the fuel screw in until it bottoms lightly, counting the number of turns of the screw. Try to get 1/4 or 1/8 turn accuracy. Write this number down. It should be from 1/2 to 2 1/2 turns, but in some cases it may be more or less than this. Unscrew the fuel screw the number of turns you wrote down. Go riding. |
Cleaning the carb
|
Refer to Changing the needle and/or adjusting the needle clip above and Detailed carb pictures below to see pictures of the carb internals. The Honda CRF230F Service Manual shows more pictures and is a great help when doing this procedure. The hardest part in the whole job is unscrewing the carb screws, with the slide screws being the hardest. Buy a set of JIS screwdrivers or you'll ruin a lot of screw heads.
Remove the carb from the bike. Look among the parts you have for the following:
Main jet Pilot jet 42
Stock needle '03-'05 16012-KPS-901 marked C39A
Aftermarket fuel screw, preferably brass, preferably Kouba. These are suggestions for a stock CRF230F. If you have made any engine mods or changes to the intake or exhaust, adjust accordingly.
If you don't have these parts, buy them before proceeding.
Assemble the carb as follows: |
Temperature and Altitude Adjustment chart
Here is a Temperature and Altitude Adjustment chart for the XR250R carb, which is almost identical to the CRF230F carb.
120 is used as a base main jet. (The stock CRF230F main jet has been determined to be too lean from the factory.)

Jetting part numbers
ServiceHonda.com, DiscountHondaParts.com, PartsFish.com,
jetsrus.com, rockymountainatvmc.com and others.
| Name | Year | Part description | Part number |
| Pilot jet, stock | All years | JET, SLOW (#42) | 99103-MT2-0420 |
| Pilot jet | All years | JET, SLOW (#45) | 99103-KPS-0450 |
| Pilot jet | All years | JET, SLOW (#48) | 99103-KAE-0480 |
| Main jet, stock high altitude | All years | JET, MAIN (#98) | 99113-GHB-0980 |
| Main jet, stock | All years | JET, MAIN (#102) | 99113-GHB-1020 |
| Main jet, recommended for riding over 10,000' |
All years |
JET, MAIN (#105) |
99101-357-1050 or 99113-GHB-1050 |
| Main jet, recommended for riding at 6,000 - 10,000' |
All years |
JET, MAIN (#108) |
99101-357-1080 or 99113-GHB-1080 |
| Main jet, recommended for riding at 5,000 - 6,000' |
All years |
JET, MAIN (#110) |
99101-357-1100 or 99113-GHB-1100 |
| Main jet | All years | JET, MAIN (#115) | 99101-357-1150 |
| Main jet | All years | JET, MAIN (#118) | 99101-357-1180 |
| Main jet, recommended for riding at sea level |
All years |
JET, MAIN (#120) |
99113-GHB-1200 or 99101-357-1200 |
| Main jet | All years | JET, MAIN (#122) | 99101-357-1220 |
| Needle set † | 2003-2005 | NEEDLE SET, JET | 16012-KPS-901 |
| Needle set † | 2006 and up | NEEDLE SET, JET | 16012-KPS-731 |
| Fuel screw set †† | 2003-2005 | SCREW SET A ††† | 16016-KCY-670 |
| Fuel screw set †† | 2006 and up | SCREW SET A | 16016-KC2-764 |
† Needle set includes the needle, clip, and normally unneeded needle jet (small brass piece).
†† Fuel screw set includes the fuel screw, spring, washer, and o-ring.
††† SCREW SET A: 16016-KCY-670 replaces 16016-393-700 and 16016-393-701
Fuel screw washer and o-ring
|
You can buy the fuel screw washer and o-ring separately if you don't want to buy the fuel screw set (above). But note the Honda fuel screw set contains the actual Honda/Keihin parts, whereas, the parts described below are not Honda parts, so there may be very slight discrepancies. Businesses are listed alphabetically. Apple Rubber I did not take the time to search out the correct size o-ring on this site, but I did read up on the fascinating variety of materials and sizes that are available. This site is included for information content. Carburetor Parts Warehouse It's best to call these guys directly. I've never had luck ordering on-line from them. They do have, or can get, the parts you need, in most cases. Keihin PWM Carburetor Parts List
Keihin FCR Parts List
Carburetor Parts Warehouse - Keihin PWM Carburetor Parts List Jets R Us
McMaster-Carr
Sudco I have never ordered from Sudco; I think they sell to dealers only. However, they have some very good carb documentation that you can download. The Sudco catalog can be read on-line and printed, but I've never been able to download a copy. Z1 Enterprises
|
Carb rebuild kits
|
You can buy carb rebuild/repair kits to R&R your carb. The kits have a selection of parts that commonly need replacing, and they cost a fraction of individual OEM parts. Two aftermarket kits, Outlaw (below, left) and Shindy (center), are virtually identical and priced very reasonably. The kits are often listed on eBay and sometimes on Amazon. I have not used either kit yet. Honda groups small parts into sets and the combination of two such sets is almost equivalent to each of the aftermarket kits. The Gasket Set (GS) and Screw Set A (SS) parts are shown in the right column.
Parts are identified with numbers that match the OEM equivalents shown in the parts fiche and parts list below. Note the two o-rings labeled '1b'; each aftermarket kit contains two of these. The combined Honda sets have two 1b o-rings also. I suspect that the aftermarket kits have two 1b o-rings because the combined Honda sets have two of them. Their kit designer apparently did not understand Honda's breakout. Note that the aftermarket kits do not include a '1c' o-ring, but the Honda Gasket Set has one. The 1c o-ring is not a doughnut-shaped o-ring. It is flat on the bottom, and the cross section shows it taller than its width. Many riders will not want to service the Air cut-off assembly (14 on the fiche) and replace 1c; doing so could damage the diaphragm and a new assembly costs about $80. Best leave that assembly untouched unless you have symptoms indicating it is not working properly. I suspect the aftermarket kit makers left 1c out on purpose.
Both aftermarket kits have the same number and kind of parts.
Outlaw Carburetor Rebuild Kit OR2536 $18
Shindy Carb Repair Kit 03-720 86030 $29 One last consideration. Although the aftermarket kits include main and pilot jets, these come in stock Honda sizes. If you have already changed one or both during your jetting setup, you'll want to stick with the sizes you have. If you want new versions of those jets, purchase them from Jets-R-Us, your dealer, or an on-line vendor.
|
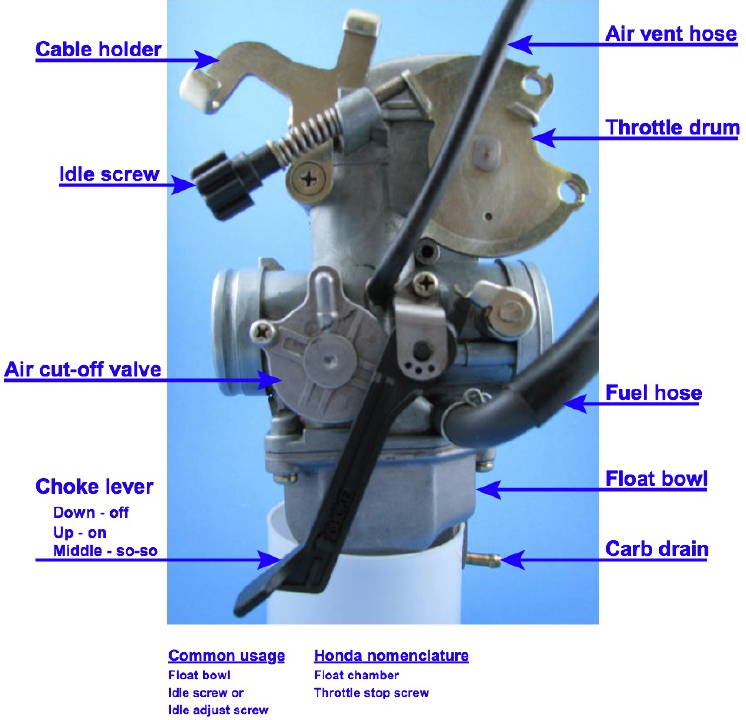
Detailed carb pictures
Here are some pictures showing most of the parts in and on the carburetor.
Note: these pictures CANNOT be super-sized.
|
|
|
|
|
|
|
|
|
|
|
Stock needle '03-'05 16012-KPS-901 marked C39A Needles are shown with the fat end up and the tapered tip down. Clip positions are numbered from top to bottom; 1 (top), 2, 3, 4, 5 (bottom). Clip position 1 is the leanest, 3 is usually the stock position, and 5 is the richest. The two-clip-position needle has stock (bottom) and high-altitude (top) positions only. |
|
|
|
|
|
Main 99101-357 series Pilot N424-21 series
|
|
|
![]()