Honda CRF250F - Modifications
May 22, 2022 version
|
Modifications |
|
|
Honda CRF250F - Modifications
|
Click pictures to supersize.
ALERT - Break-in started March 17, 2019 and ended on April 21, 2019.
See Break In
My CRF250F YouTube videos:
CRF250F on Rainbow Trail
CRF250F Aspen Tunnel - Spring
I modify most motorcycles that I buy. As a must-do mod, I replace the stock handlebars with aftermarket bars that I have used for many years. I like the rise and set-back, and they are aluminum, of course. I find that there are other small tweaks that I prefer, and apply those as appropriate. And I usually remove plastic that I consider useless. In particular, side number plates.
Guiding principles:
Preserve and enhance reliability (survival in the back-country)
Street-legal (DS) equipment to obtain street licensing (connect trails and areas)
Reduce weight.
Improve performance.
Enhance comfort.

So on with the show, if I can just find some room to work.
Bored reading? Take a break.
Video of Race in Brazil:
CRF250F wins the 5th Challenge...
|
NOTICE - Bank Angle Sensor Ignition Cut-off System Your motorcycle's banking (lean angle) sensor system is designed to automatically stop the engine and fuel pump if the motorcycle is overturned. Before restarting the engine, you must turn the ignition switch (key) to the OFF position and then back to ● (ON). The engine will not restart until you perform this procedure. Page 28 of the 2019 CRF250F Owner's Manual. 0750.2018.09.K
ramz note: the BAS (bank angle sensor) function check shows: |
Alphabetical table of contents
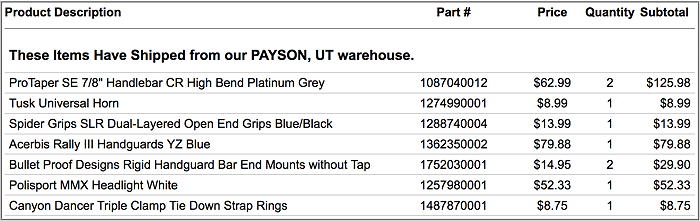
Parts and prices are shown at the bottom of this page.
Modifications are shown below in roughly the order I did them.
I live in Salida, a small town in central Colorado. The nearest motorcycle shop is 60 miles away (Gunnison) with more shops in the front range 100 or more miles away. So I do most of my shopping online. I buy Honda parts from one or more of the online vendors shown in this list on the Introduction page. I buy non-Honda parts from Amazon , Rocky Mountain ATV/MC , MotoSPORT.com , and other online vendors as I encounter them in Google searches for specific products. I do not endorse nor disparage any vendor or parts they sell. I buy parts, install them, and report any features and/or problems I find. There are certainly many other vendors who sell perfectly useable products - Google is your friend.
Weigh-in
The first thing I did when I got my 250F home was empty the gas tank and weigh the bike. It weighed 248 pounds. The bike was stone stock, no mods. All fluids checked and topped up, and the gas tank was empty.
About that number. I weigh bikes using a WalMart scale I bought 20 years ago. I don't use the scale in the house; it's strictly used to weigh things in the garage, so it gets very little use. I check its accuracy now and then by weighing myself at Dr appointments, and then coming home and see how close my scale is to the Dr's scale. It's usually within a pound or two.
So why don't my numbers match Honda or Yamaha or other moto maker's numbers? Can't really say. But I don't really care. I only care how heavy my bikes are comparing one to another. So how does 248 pounds compare?
CRF230F - 233 CRF250F - 248 CRF250L - 298
This is great! These numbers are for brand new bikes, fully set up to ride, with no fuel. No matter what mods I do (adding and removing weight), these numbers represent a base weight that is probably 95% of the finished modified bike weight.
Furthermore, the weights relate to the intended use of these motos thusly:
CRF230F - primarily technical-single-track trail riding (TST), with some dirt-road dual sport. Base 233 lbs.
CRF250F - primarily dirt-road dual sport with some TST. +15 lbs - excellent.
CRF250L - primarily dirt-road dual sport with some easy trail riding. +65 lbs - heavy, but the only choice I had.
The 50 pound drop from the 250L to the 250F should make for a very fun DR/DS experience.

Yahooo, most of the DS parts have arrived!
The first mod - Tie-down brackets


I found these several years ago, and have been installing them on all of my bikes since. They are SO convenient to use, and make securing the bikes a breeze. Two different brands are shown here: I was trying one of each out on my 250L to see which one I liked best. They're pretty much the same, and I never swapped one or the other back so they would match up. Meh.
Canyon Dancer Triple Clamp Tie Down Strap Rings - about $9. Rocky Mountain ATV MC
Shifter bolt - my favorite mod

I moved the shifter up two notches, and replaced the shifter pinch bolt with a longer bolt and a lock nut.
Air box
Yes, I did an air box mod; opened up the inlet about 50%.
My 250F needs all the air it can get; trail riding elevation starts at 8,000 feet.

There is a cast-in divider; I used it as my cut line. Finish opening size - about 1 3/8 x 1 5/8 inches.


Seat bolt lock washers

I lost a seat bolt on my CRF230F about 10 years ago, and after this mod, I never lost another. Works for me.
Throttle cable

I have always removed the push throttle cable from dual-cable throttles. I have never experienced a stuck slide due to high vacuum on the engine side of the carb slide.
After removing the cable, the pull cable needs minor readjustment. Plug the empty hole in the throttle cable cover with Shoe Goo or something similar. Plug the empty hole in the throttle drum cover on the carb with an M6 flange-head bolt with a locking nut on the inside.
The throttle operates almost effortlessly.
Tach/Hour meter

This Moose Tach/Hour meter mounted in front of the fuel tank shows:
Total hours of operation
Current RPM
Maximum RPM
Number of engine starts

Wire wrap connection on spark plug wire; no soldering required.
No battery required.
Moose Hour Meter With Tachometer - about $35. MotoSport
GPSr mount

With no speedometer on the 250F, nor even a simple odometer, I took the easy way out, and mounted up a Garmin Montana 610. The mount is not wired to the battery yet; I will add power when I install the dual-sport wiring harness.
Note: The stock handlebars are shown here because the new Pro Tapers have not yet arrived.
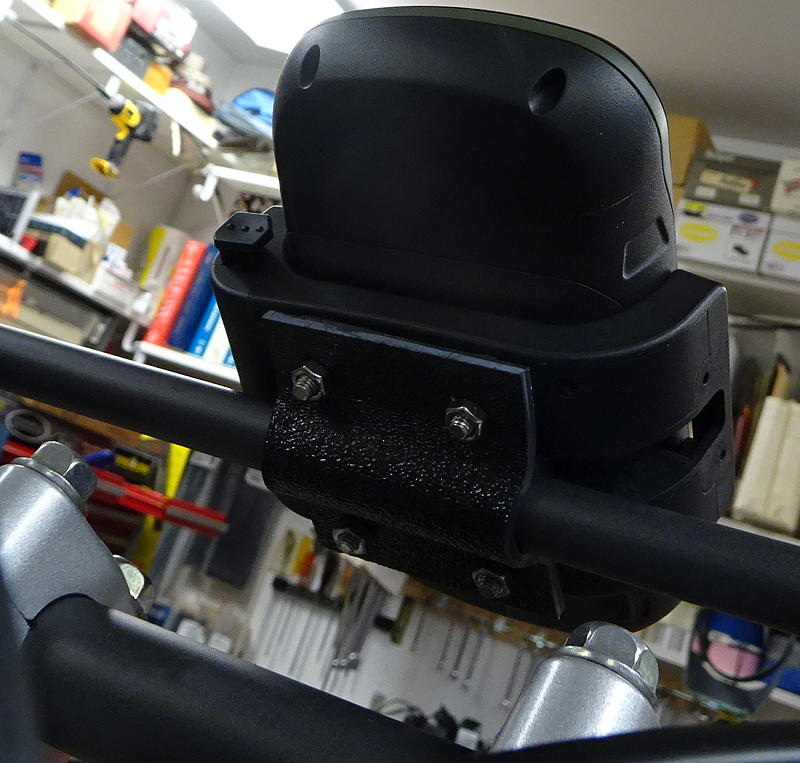
The large black plastic wrap-around piece is the Garmin AMPS rugged mount with the power cable removed for now. You can buy it from Garmin or from any one of several aftermarket GPS parts vendors. The black mounting plate is Kydex, my favorite plastic for making custom parts for my motos.
There's a small 2 x 2 inch sorbothane pad up against the back of the GPSr for vibration isolation and as a friction interface to prevent the GPSr from rotating on the cross bar.

The brake hose is nowhere near the unit; it's a perspective effect. I can slide the unit left or right along the crossbar as desired. I think I'll go for far left to keep it out of my forward-looking field of view.
Handlebar, grips, and handguards
I like the ProTaper SE in CR High, and installed them on the last 5 bikes I've owned. This time I went for the platinum grey look - and I like it. The SE (at 812 g) weighs 111 grams less than the stock Honda bars (at 923 g). I feel less vibration with aluminum bars over steel bars.

Handguard Bar End Mount kit used to mount handguards to handlebars.

First I trimmed the bars to width, which is about 30 inches or line #2 mark on the bars. Then I installed Handguard Bar End Mounts. I tapped the aluminum bars with an 11-xx tap. The bar end mounts are coated with locktite and then screwed into the handlebar ends. The handguard mounting bolts screw into the mounts with more locktite that yields a very firm, locked-in result.
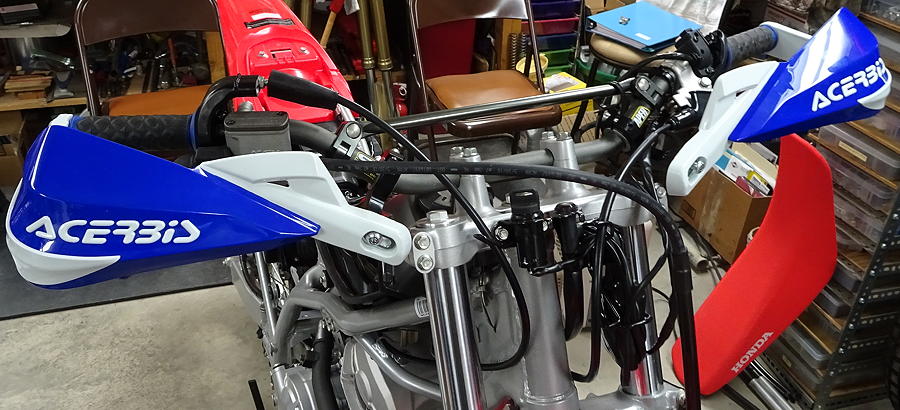
Trial fit.
Note the installed Spider grips.

ProTaper SE 7/8" Handlebar CR High Bend Platinum Grey - about $63. Rocky Mountain ATV MC
Bullet Proof Designs Rigid Handguard Bar End Mounts without Tap - about $15. Rocky Mountain ATV MC
Acerbis Rally III Handguards YZ Blue - about $80. Rocky Mountain ATV MC
Spider Grips SLR Dual-Layered Open End Grips Blue/Black - about $14. Rocky Mountain ATV MC
Skidplate
No one is selling CRF250F skidplates! But I gotta have a skidplate!
Not that skimpy stock one, but a real skidplate.

I looked through my old parts bin, and lo and behold, I found an AXP skidplate. Could it work? I clamped it to the frame rails in front and under the engine, and by golly, it fit. I'll drill the mounting holes later this afternoon.

I got the skidplate mounted. Sano.
Sprockets/Chain
MotoSport has rear sprockets for the CRF250F. I bought several. They will have front sprockets when they are available from the manufacturer.

I remove the sprocket cover so mud doesn't jam up in there and ruin my chain. I was surprised to see how little room there is between the chain and the case protector. I don't think a 14 tooth sprocket will fit in there...
If you look in the lower left corner of the picture, just above the shifter arm, you can see a circular black something - that is a seal covering the hole where the neutral switch wire comes out of the tranny. You can see the black insulated wire snaking it's way up the engine to a wire bundle near the top of the picture.
The area where the wire comes out of the tranny is covered by the lower part of the sprocket cover. If I remove the sprocket cover, I expose the wimpy wire and seal to all sorts of debris from the chain. So I decided to keep the sprocket cover on the bike, but to cut some of it away so mud and other debris can still find a way out. Picture coming.

I cut out part of the sprocket cover, and will see how it works like this. I can cut more off later.
The neutral switch wire is well protected at this point.
After riding the 250F for about 3 months, I discovered a problem with the chain - it was kinking and making noise when rolling on and off. Steady throttle was ok. I tried different chain lubes, and the kinking persisted. Even Tri-Flow didn't help.

I replaced the chain with a DID VT2, the best chain I've ever used. I used a rivet master link in lieu of the supplied clip master link.
While I had the rear wheel off, I also replaced the rear sprocket with a Supersprox Stealth gold 50T sprocket, another favorite of mine. The initial ride after the install showed that I had solved the problem. There was no chain noise, and no detectable kinking. SUCCESS!
Note - see One more thing... for adjusting chain slack procedure.
Stock chain 1,717g VT2 1,705g saving 12 g
Stock sprocket 986g Supersprox 762g saving 224 g
Total savings 236g - every little bit helps.
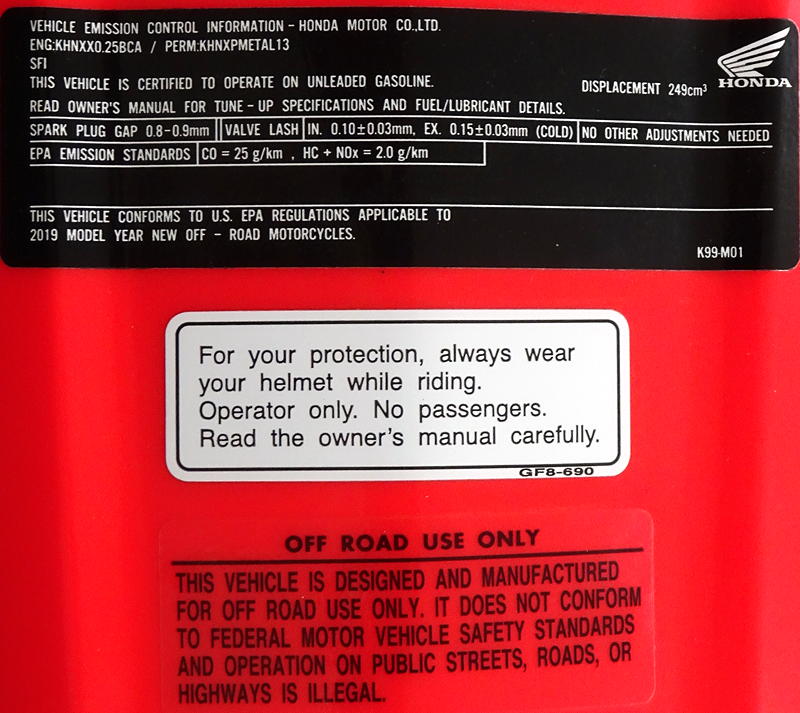
The stock chain was marked DID BR VD 520
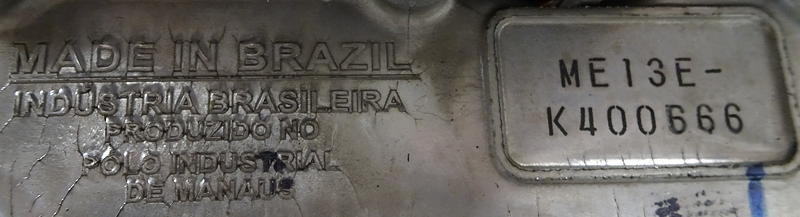
I assume BR means Brazil.
DID 520 VT2-114 Gold Narrow X-Ring Chain - about $100. Amazon
DID 520 VT2 Rivet Style Master Link - about $8. Rocky Mountain ATV MC
Supersprox Stealth Rear Sprocket Gold 50T - about $91. MotoSport
Side number plates
Those who know me, know that I don't like number plates on bikes that I register for street use. They make the bike stand out too much, they don't do anything for performance, and they just cost money to replace after you fall on them. So I always take the number plates off and make replacement Kydex covers, as appropriate.

Kydex panel forthcoming...

Make a mockup on the bike using a piece of manilla legal folder.

Cut a piece of black Kydex using vanilla pattern.

Clean up the black piece.

Heat, trim, and shape.

Looks passable; fully functional.

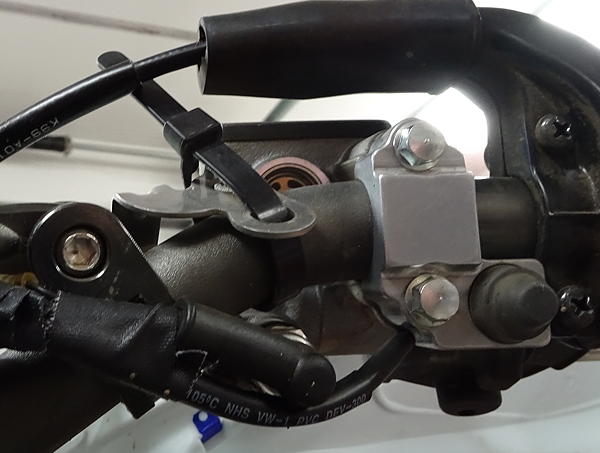
Now what?.


I removed the shrouds, and that left the ignition coil exposed.
In the left picture, it's bolted to the frame bracket in the stock position.
In the right picture, I moved it to the inboard side of the bracket, for protection.
Be careful; the metal backing piece is not a solid piece. It's made of laminated plates that will separate easily. Just keep them together with your fingers as you move the part to it's new position.

Then I covered the bracket and coil with Kydex. The two 20 ga wires are protected also.

The right side with the nice air box cover is done; no Kydex panel is necessary.
I also removed the plastic cover over the rear brake master cylinder.
Muffler

I removed the exhaust pipe heat shield, and the metal tab on the side of the muffler. I ground the rough spot on the muffler smooth, and painted it with some heat resistant paint. BTW, the complete stock muffler and s-bend weighs 5 lbs 11.4 oz (excluding the 3 bolts and 1 nut). A stock CRF230F muffler and s-bend weighs 5 lbs 10.4 oz (excluding mounting bolts).
The exhaust diffuser is inside the spark arrestor; they cannot easily be separated.
But some nimnul will try...


I used my DeWalt proctoscope to look into both ends of the muffler/s-bend. No catalytic anythings were seen, just open all the way through without any obstructions. Silencing appears to take two forms: some kind of metal mesh lining against the inner surface of the outer walls and perforated pipe in many places. But no chambers or doubling back exhaust gases paths.
Initial rides at the dealers parking lot and in my 2 acre yard (3 laps) were surprisingly noisy. Even though the CRF230F and the CRF250F are both rated 82 dBA, the 250F is considerably louder. Not as bad as the 230F with the exhaust diffuser removed, and altogether not that bad to listen to. We'll see what all-day exposure to the melody will do to my sensitive ears.
Dual Sport mods
topHeadlight

I gave up looking for an LED headlight to keep power draw to a minimum; there's only 209 watts at 5,000 RPM to be had. They were either too big or too expensive.
Polisport MMX Headlight White - about $53. Rocky Mountain ATV MC
topMirror

I tried the MSR mirror, but it was too flimsy.
So I went with the DoubleTake mirror and RAM mount.
Double Take Replacement Enduro Mirror - about $25. Rocky Mountain ATV MC
Ram Mount Motorcycle Brake/Clutch Reservoir Base with 1-Inch Ball - about $14. Amazon
MSR Dual Sport Mirror - Left Side AC01996 - about $13. Amazon - tried, but switched to DoubleTake.
Horn

The horn is buried under the wiring and just below the ignition switch.
Tusk Universal Horn - about $9. Rocky Mountain ATV MC
topTaillight and license plate holder

Every time I mounted a taillight assembly on an XR or CRF, I was confronted with the same problem. There isn't enough frame extending out the back to solidly mount the taillight assembly so it doesn't flop up and down while riding. On recent CRFs, I've resorted to using hose clamps to fix the problem; finally a solution. I tried zip ties, but they always break when the plastic dries out enough and weakens the zip tie - POP goes the weasel. So although they don't look that great, they do solve the problem.
I use stainless steel metric fasteners (bolts, washers, nuts) and hose clamps to mount the taillight assembly to the rear fender (size M5) and to mount the license plate (size M4). Plus two small-head flanged M6 bolts for the front end of the taillight assembly. All nuts are locking type, so LocTite is not necessary. The M4 and M5 fasteners are chosen to keep the weight to a minium - less flopping.

Final look

Step 1 - fix the LED mounting bolts. These bolts hold the LED in place on the taillight sub-fender. They are M3 bolts and I think they are too long. So I shortened them. I wanted to avoid the situation where a rock hits one of the long skinny bolts, and leverages it sideways, causing it to break out the back of the LED.
You can see the final result in the picture below showing the D bolts.

Step 2 - trim the fender; here's a final look that I like. I took off about xx inches. You can use whatever you like. Some riders like the light up under the fender.... One consideration - where does the front of the assembly end up under the fender? Trimming needed?
For trial fitting, I use a pair of plastic clamps to hold the taillight assembly against the fender and do a lot of back-and-forth until I get a look I like.
Step 3 - Mount the taillight assembly to the rear fender. The taillight assembly is not a good fit to the frame rails and rear fender; you must persuade it to fit by some use of force. I anchored the front end to the frame cross member using the M6 bolts (E) and loosely tightened the nuts to allow some side-to-side wiggling of the rear of the taillight.
I use some smallish plastic clamps to hold the taillight piece against the frame rails and drilled and mounted the C bolts loosely. I then cut the slots for the hose clamps and mounted them loosely.
Be aware that you should leave yourself some grab space between the right-side hose clamp and the muffler mount. You don't wanna be grabbing the sharp edges of the hose clamp when you have to lift the rear of the bike.

Hose clamp detail.
I then tightened the E bolts, the C bolts, and the hose clamps a little at a time, wiggling for fit until all was tightened adequately.

Step 4 - The license plate holder (Kydex-above) is bolted to the rear of the taillight assembly with 4 M4 bolts, washers, and locking nuts (A). I formed a piece of Kydex so it fits around the edges of the license plate to serve as a protector so the license plate doesn't slice through any of my body parts as I'm falling off the back of the bike.
The license plate is held in the license plate holder with 4 M4 bolts, washers, and lock nuts (B).

Tail end.
(A) - 4 M4 bolts, washers, and locking nuts hold the license plate holder to the rear of the taillight assembly.
(B) - 4 M4 bolts, washers, and locking nuts hold the license plate in the Kydex frame.
(C) - 2 M5 bolts, washers, and locking nuts hold the taillight assembly to the rear fender.
(D) - 2 M3 bolts, washers, and locking nuts hold the LED to the taillight assembly.

(E) - 2 M6 bolts hold the taillight assembly to the motorcycle rear subframe crosspiece.
(F) - 2 hose clamps hold the taillight assembly to the motorcycle rear subframe extensions.
Front end.
The light blue material is foam, used to block off the hole in the sub fender through which the taillight wiring harness passes on its way to an area under the seat. I cut off the supplied 3-pin plug on the end, and ran the three wires into their respective spots on the Wago connectors.
One last comment. Every different brand taillight assembly will have different mounting requirements. I chose the Tusk because it has a large license plate mounting area and a white lens so the red LEDs shine through very brightly.
Tusk LED TailLight/Brake Light Under Fender - about $30. Rocky Mountain ATV MC
Hardware prices depend on where you shop.
Baja Designs Hydraulic Brake Switch Nissin Brakes
Ensure that the thread pitch is correct (10x1.25mm) before you attempt to install. One of the 3 I ordered was incorrect; RMAM made good with an exchange. The switch assembly takes the place of the banjo bolt; top up with DOT 4 as needed.

The front brake switch is mounted on the front brake reservoir, to the left of the horn button.

The rear brake switch is mounted on the rear brake reservoir, near the brake pedal.
Baja Designs Hydraulic Brake Switch Nissin Brakes - about $18. Rocky Mountain ATV MC
topDual Sport wiring


Wago 221 connectors make short work of wiring. I used 4 of the 5-conductor connector blocks.
Wago connectors assortment - about $22. Amazon
Electrical notes
The stock wiring on the US 250F model has no provisions for lights, horn, and other electrical accessories. I have added electrical accessories to other bikes in the past (CRF230F and others), so I decided to do the same for the 250F. After looking at the 250F wiring diagram, and its rather extensive wiring of the FI sensors and ECM connections, I decided that my additional circuitry should be independent, and not attach-to or modify the stock circuitry.
Initially, for simplicity, I wanted to add only one circuit with a master on/off switch. But eventually I went with three additional circuits:
Montana GPSr powered mount direct to battery with no switch,
GPSMAP66i powered mount with on/off switch and 12vto5v converter,
Lights and horn with on/off switch.
The Montana powered mount circuit has no need for a switch because the mount alone does not have any parasitic drain. If I wanted to leave the Montana in the powered mount overnight or longer, I would need an on/off switch, because there is a small parasitic drain, and it would run the battery down. I only put the Montana in the mount when I am actually riding the bike, so I elected to do away with the switch.
The GPSMAP66i powered mount circuit needs an on/off switch because there is parasitic drain, even when the 66i is not mounted. This is because the 66i is a 5 volt device, and I installed a Battery Tender brand 12 volt to 5 volt converter. The converter always draws some current, even when the 66i is removed from the mount.

I mounted the Yak-Power on/off switch under the left side of the fuel tank and frame instead of on the handlebars somewhere just to keep the handlebar area clear for other uses.
 The Yak-Power switch is built into the SAE wiring, and easily placed where desired. I removed the supplied mounting plate and used a zip-tie to secure the switch in place.
 The Battery Tender USB Charger Adaptor (12v to 5v converter) is mounted behind the headlight, where it is connected between the Yak-Power switch and the 66i powered mount by wires in a small wire harness.
 The powered mounts with GPS receivers mounted.
The lights and horn circuit needs an on/off switch. I like to be able to turn off all lights when riding trails, so as not to disturb others riding behind me.

I installed a Yak-Power switch under the seat-tank junction. I removed the supplied mounting plate and used a zip-tie to secure the switch in place.
The taillight is on when the circuit on/off switch is on, and the brake light comes on whenever the front or rear brake is used.

The headlight is controlled by a 3-way switch mounted by the ignition key - lo, off, and hi.
The horn sounds when the horn button is pressed.
I'm using the Wago 221 connector blocks to make the wiring easier (see Dual Sport wiring above). There is a pair in each location; one block for power and one for ground. There is a pair under the seat on top of the air box and a pair behind the headlight. I use home-run wiring, where each powered item has it's own run to the power and ground blocks. Easy Peasy.
Yak-Power YP-ILS16 Waterproof Inline 12v Power Switch - about $21. Amazon
Battery Tender USB Charger Adaptor - about $10. Amazon
Garmin GPSMAP 66i Powered Mount, Mfr. P/N: 010-12825-00 - about $29. GPS City
Brake Perch Pushbutton Switch, 12v 2amp Momentary, Black Boot - about $32. Highway Dirt Bikes
Shifter mod

The stock 250F shifter is on the right.
A stock Honda CRF150R shifter is on the left. It's only about 1/4 inch longer, but it fits much better.
I may have to change the bend, but only a little.

The stock 250F shifter is on the right.
An aftermarket CRF250L shifter is on the left. It's a little more than 1/4 inch longer.
I didn't try it; just pointing out options.
Although the CRF150R shifter added more length, it didn't have the bend in the right place, so I moved it down the shaft a bit.

You can see where I marked it to make it a better fit around the engine side case.
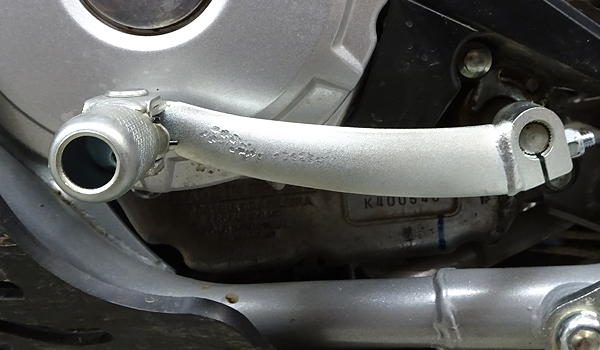
I like a raised shifter to keep it away from rocks.
Oops, see the vise marks.
CRF150R/RB PEDAL, CHANGE 24700-KSE-000 - about $50. Rocky Mountain ATV MC
Footpeg wideners
I suffer from instep fatigue when I ride for longer than about 5 hours. I use ortho inserts in my riding boots, but that doesn't completely solve the problem. Some time ago, I discovered that larger footpegs provided a great deal of relief. Here's what I did; story below.
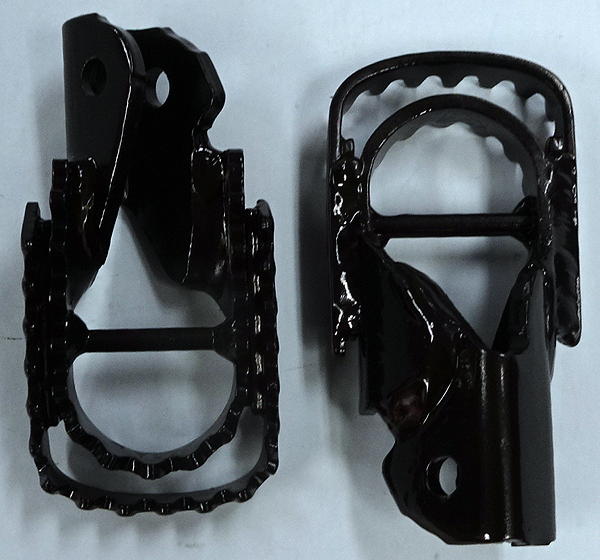
Welded and painted.

Mounted


The rest of the story.
When I had my 2009 WR250R I had a need to widen the footpegs. I had used a footpeg widening product on several bikes I owned in the 70s, and I went looking for them on the interweb. Lo and behold, I found some Works Connection footpeg wideners. They looked just like the ones I used on my bikes from the '70s with the wimpy footpegs. Exactly like 'em.

They come in many widths so they fit virtually any footpeg out there. I ordered a set of 1 1/2" for my WRR and a set of 1 5/8" for my CRF230F. Actually, I ordered several of each.
When they arrived, I noticed the 1 1/2" wideners didn't fit the WRR footpegs exactly. I used a grinder to take off 1/32" or so on the inside of the spacer and then they fit just fine. The local welding shop charged me $15 to weld the wideners on and walla, wide footpegs.
The wideners add 1/2" to the width and about 1/4" to the length, and that is just about right for my small 8 1/2 foot.
In the picture, the upper two WRR footpegs have the wideners welded on and I'm showing a top and bottom view. A stock footpeg is just below for comparison. The two wideners are very simple, with just an extra strip of spacer welded to the inside edge to get the teeth away from the stock teeth. Click the picture to see the details up close.
Works Connection footpeg wideners - about $30 per set. MXSouth and Works Connection
EJK controller
I had an EJK controller on my 2013 CRF250L, and it worked very well, thank you. I contacted EJK (actually Dobeck Performance) to see if they would be making a controller for the CRF250F. They had not heard of the 250F, so I filled them in.
After discussions and planning, I am now testing a prototype CRF250F controller. I am seeing some definite improvement in engine performance. Besides testing at my local riding area elevation (8K to 10K), I plan to test at lower and higher elevations also.
When all is said and done, Dobeck Performance may bring a CRF250F EJK controller to market. Much depends on market demand. Demand is gauged by how many riders call and ask for one of these.
You can follow my testing progress by checking my Break In page. If you like what you read, visit the EJK web site. Have a look at their products, then click on Contact and let them know you want an EJK for your CRF250F. Depending on when you read these words, there may already be a CRF250F controller in their inventory.

Easy to see, easy to change.
Riders usually put these under the seat, on the airbox. I needed it here so I could see the lights in action, and change settings as needed.

Power ON
Related to the EJK - Clevio Santos, a TT inmate apparently from Brazil (posts in Portugese) asked if the ECU could be remapped or tuned. He posted a picture of his ECM showing part number and other identifying information. (ECM is Honda's name for the ECU on the CRF250F.) Recently, I was able to get the same info from my own CRF250F:


I have a reprogrammable ECM on my Montesa Cota 4RT, and I have read about the 2017 CRF450 PGM-FI tuning kit. But I have not read about any such tuning kit for the CRF250F. For now, the EJK is the only tuning kit available for the 250F.
Renazco seat

My tomato is gone, sent to Renazco Racing for a face lift.

The Renazco seat, custom made for me.
He'll be happy to make one for you.

Wide track for comfort.

My butt feels better already.
The dip is virtually gone.
Renazco custom seat - about $350 plus shipping. Renazco Racing
If you want to avoid down-time while having your seat redone, order a new one and send IT off to be redone. The parts numbers were confusing to me, so I ordered both to see what's-what. I don't understand the pricing... (The front of the seat appears twisted because of the camera lens skewing; the seat is perfectly straight.)

Prices shown are out-dated; current price depends on which dealer you order from. About $43 each from partsfish.com and others.
Seat Details
There are two plastic tabs that extend downward near the back of the seat. Bolts go through the tabs and through tabs on the frame and are secured by nuts. Look in under the rear fender. Remove the nuts and the bolts. Lift the rear of the seat slightly to free up the rear latch, and slide the seat rearward. The under-seat securing pockets near the middle of the seat will slide out of their metal frame-mounted hooks, and the front latch will disengage from the fuel tank boss. Keep pulling the seat rearward until it's free.
Putting it back is not so easy.
The front latch and the under-seat securing pockets near the middle of the seat are difficult to engage simultaneously! Once they are engaged and you begin sliding the seat forward, guide the tabs into the openings on each side of the rear fender. Continue sliding the seat forward and push the rear latch down into the pocket on the rear fender. Once everything is secure, pull up on the rear of the seat to insure the rear latch is properly engaged. If not, slide the seat rearward a bit, and try again. Install the bolts and nuts. You may have to wiggle the seat forward/backward to get the tab holes to line up with the frame tab holes.

Kouba Link

Super light weight:
Stock Honda link 642 g, KoubaLink 351g
Saving 291 g (10 ounces)
Zerk fitting = convenience

When I installed the link, the stock Honda bolts were dry, so be alert and grease 'em up.
After installing the link, I dropped the triples 3/4 inch, measured at the fork-cap/fork-tube joint.
Renazco seat height is 33 1/2 inch at the lowest point in what's left of the dip; see Renazco seat panel
Stock seat height will be slightly lower, about 33 1/4 inch.
Ride report on 'Break In' page.
Note - see One more thing... for adjusting chain slack procedure.

The 250F with KoubaLink, about 1 3/4 inch lower than stock.
The 230F with a 150F lowering link, about 3/4 inch lower than stock.


It's not a trick of perspective; the 230F is actually taller.
Honda 2019-up CRF250F (Air Cooled) 1 3/4" rear lowering - about $140 plus shipping. Koubalink
One more thing...
As Steve Jobs would famously say - There's "one more thing..."
Now that you have the Koubalink installed, you have 'one more thing' to do - adjust the chain slack to accomodate the new suspension setup. But Honda's specified chain slack is incorrect for the Koubalink-modified suspension. What to do?
My process overview:
Remove suspension bolt
Align centerlines
Set chain slack for tightest position
Install suspension bolt
Check chain slack and record value for subsequent use
Put the bike on a stand. Remove the nut and bolt from the Koubalink as shown. You may have to jiggle the wheel up and down very slightly to take the load off the bolt as you slide it out.

Lift the rear wheel to align the rear axle, swingarm pivot bolt, and front sprocket centerlines. I used an aluminum straight edge.

Set the desired slack - I used 12 1/2 mm (1/2 inch), measured on the top chain run. 48 - 35 1/2 = 12 1/2 mm
This value is based on an article I read a dozen years ago about chain slack; I've used it ever since.
This is the slack in the chain at one of its tightest positions. Normally, a chain is tightest when the three alignment points shown above are in a straight line. If there are chain rollers above or below the swing arm, there will be other tight positions. There are none-such on the 250F.
If you can't set the chain slack to the value you want because the chain adjusters are either too loose or too tight, looser is better than tighter.


Clean the bolt, then grease it lightly. Replace the bolt and nut. You may have to jiggle the wheel up and down very slightly to take the load off the bolt as you slide it in. Torque the nut to 32 ft-lb.
Set the bike in your preferred position for adjusting the chain slack:
side stand,
bike stand,
free standing on the ground, held vertical.
Measure the chain slack; write it down. Write the preferred position also. Consider a sticker on the swing arm or nearby frame. Cover with clear tape so it doesn't wash off.
I measured 20mm on the motorcycle stand, and will use that going forward. The Honda Owner's Manual shows 30-40mm for the stock suspension setup on the sidestand. Quite a bit looser than with the Koubalink.
MoJavi saddlebags
I estimate that the small 1.6 gallon fuel tank on the 250F will yield about 70 to 100 mile range, depending on terrain and throttle application. For longer rides, I will mount up the MoJavi saddlebags with 1 or 2 fuel canisters, depending on my expected ride length.
 MoJavi™ Saddlebags by Giant Loop
Giant Loop makes MoJavi Saddlebags and here's what they have to say about them:
"Specifically designed to carry just the essentials needed for a day trip or trail ride, the MoJavi Saddlebag is the slim, trim bag for inner tubes, tools, fluids and other "save a ride" necessities."
These bags are the shiznit. I bought the original design for my WR250R and now have the newer model for the CRF250F. These have an optional tool pouch.

The black canister is a Touratech 2 Liter Spare Fuel Canister. They fit nicely in the MoJavi with some room left over. Two of these adds over a gallon of extra fuel - GREAT! I will carry these when I go on longer rides to get my range up over 150 miles.
NOTE: In August 2021, I bought the XCELL plastic fuel tank from Olimotos, a dealer in Brazil. This tank is slightly larger than the stock tank;
details here: Honda CRF250F - Fuel Tank Replacement
MoJavi™ Saddlebag - about $212. Giant Loop
Touratech 2 Liter Spare Fuel Canister 070-0580 - about $28. Touratech
Tires
Got tires?


The best tires for riding trails in the Rocky Mountains are full-on FIM-specified competition trials tires. Yep, trials tires. Run them at low pressure with tubeless rims and no better traction can be found. Rocks - easy peasy; slimy rocks and roots - laughing all the way! Hard-pack, soft-pack, and slimy dirt - goes without saying. Their only weakness is deep mud. The knob spacing is so small that mud packs in and traction drops significantly.
The top-of-the-line setup is very expensive. Trials tires are expensive and wear out quickly. Tubeless rims are like gold. So riders have found cheaper, less-capable setups, and traction is only slightly reduced. Still better than knobbies!
A step down from competition trials tires are DOT trials-like tires. These tires have the same knob spacing and similar knob shape as competition trials tires, but the rubber is harder to facilitate limited use on roads. Traction is reduced, but still better than knobbies. The sidewall is stiffer than trials tires, so some traction is lost there also. A benefit of this tire is the ability to hook up trails with connecting road sections.
Recently, some tire manufacturers have come up with hybrid tires. These tires have more space between the knobs to help clear the mud and the rubber is very soft, like a competition trials tire. Their sidewall stiffness is somewhere between trials and DOT tires. Some consider the hybrids to be the ultimate for dirt road and trail riding. Unfortunately, most of the rear hybrids are full size 4.00-18 and when used on smaller-frame motorcycles, they raise the rear end and quicken steering beyond comfortable.
In lieu of tubeless rims, riders use the less expensive Nuetech TUbliss tire system. I tried it, then I switched to mousse several years ago for maximum reliability. Several brands came and went, and now I'm using Nuetech NitroMousse. See also my Mousse web page.
So what tires do I use on my trail bikes?
For the front, I use a Pirelli MT43 DOT. I like a stiffer sidewall on the front so I can push the tire to help with steering. I also like to ride rocks aggressively - less effort in the end. Inside the tire is a mousse. Now yer talkin 'aggressive in the rocks'. I have no fear on where the front-end goes in rocks.
For the rear, I normally use a SHINKO Trail Pro 255 Radial 110/90R-18. For the 250F, I'm going with the Maxxis hybrid. I will adjust frame geometry as best I can to deal with the larger-profile rear tire. I hope the traction improvement will be enough to offset the geometry complications. I will use a mousse in this tire, also.
| Stock Tires | |
|
Text on stock front tire PIRELLI SCORPION XCMID HARD HEAVY DUTY 80/100-21 51R NHS TUBE TYPE XE 078B 3718 |
Text on stock rear tire PIRELLI SCORPION XCMID HARD 100/100-18 59R NHS TUBE TYPE XE 079B 361B |
| New Trials-like Tires | |
|
Text on the MT43 front tire PIRELLI MT43PROFESSIONAL E3 75R-0055466 2.75-21 - 45P PLIES: TREAD 2 POLYESTER SIDEWALL 2 POLYESTER MADE IN BRAZIL - DOT XE 23 E144 1916 MAX LOAD 165 kg (364 LBS) AT 230 kPa (33 PSI) COLD TUBELESS ON TUBE TYPE RIM FIT A TUBE |
Text on the MAXXIS rear tire TRIAL MAXXMAXXIS E4 75R-0008079 4.00R18 M-7320-1 M/C 64M MST RADIAL TREAD 2 PLIES NYLON + 2 PLIES KEVLAR SIDEWALL 2 PLIES NYLON MADE IN TAIWAN LOAD RANGE B DOT UYDD 1818 MAX LOAD 280 kg (617 lbs) AT 230 kPa (33 psi) COLD TUBELESS - |
Other tire-related details.
The front rim is a DID 21 x 1.60; the rear is a DID 18 x 1.85
Durometer-A tire readings are (Fr,Rr): stock 65 and 75; new trials-like 65 and 50.
Yep, 50!!! Like velcro.
Ah, the best laid plans......
All mods for getting a license plate (aka street legal) have been done, and it's time to install the DOT trials-like tires. The tires of interest are gathered for a look-see.

There's no way that Maxxis will work. It's just too darn big.
And that Shinko is a bit too small.
What to do?
A quick check on the Shinko web site and I found a Trail Pro 255 in 120/90R-18. I ordered one from Amazon. I'll track down the mousse later.
Meanwhile, I installed the 110/90 and the correct Nitro Mousse insert that I had on hand for one of my 230F motos. I'll ride the 110 until the 120 comes in, then swap in the 120. I think it will be a better fit for the heavier 250F than the 110 that I use on my 230F. Note - a 10 mile test ride in some over-sized gravel and embedded rocks later in the day proved the 110 will be adequate for the short term.


After a VIN check and equipment inspection from a CO State Patrol Officer, I visited the County Clerks Office to hand in my paperwork, and get a title, rego, and plate. I got a temporary plate and registration; the final will be here in a few weeks. But I can now ride out from my driveway to the first dirt road about 1.5 miles away. Then it's dirt all the way to Canada. ;-)
5 days later, got the license plate.

Got the Shinko 120
Looks like it's a bit smaller than the Maxxis.
It will probably be just right.
NitroMousse did not list the Shinko Trail Pro 255 tire on their fitment page, so I contacted Matt at Nuetech (as noted on the fitment page), and he sent me instructions on how to measure the Shinko tire. He then told me which mousse I needed (NNM18-285), which I ordered from Slavens Racing in Colorado Springs. Two days later, the Nitro Mousse arrived.

After a short tussle with the 120 and mousse, I prevailed. Well, I had help because it turned out to be two-person effort.

It's just right.
Check ride tomorrow; can't wait.

Perfect size for my setup. This is the tire and mousse I will use.
My thanks to Jeff at Nuetech and the guys at Slavens Racing for their prompt and professional help.
The trails await, and the weather is perfect.
Pirelli MT 43 Pro Trials Tire 2.75x21 - about $72. Rocky Mountain ATV MC
Nitro Mousse 80/100-90/90-21 - about $113. Slavens Racing
Shinko Trail Pro 255 120/90R-18 - about $79. Amazon
Nitro Mousse NNM18-285 - about $113. Slavens Racing
Advanced Mini Gauge

The 12oclockLabs Advanced Mini Gauge is a small gauge attached to the 250F wiring. The gauge shows:
RPM with top bar-graph capability
Gear Position Indicator capability which supports 2 to 9 gears
Engine Temperature with top bar-graph capability
Air Intake Temperature
Hour Meter with edit capability up to 999,999.99 hrs
Odometer with edit capability up to 999,999.99 mi or km
Battery Voltage
Speed with calibration capability
Basic sensor diagnostics (MAP, TPS, INJ, etc)

Connection to the DLC (Data Link Connector), the diagnostic port, which gives electrical access to the ECM. No other connection to the wiring is necessary. There is no connection to the battery; it gets power from the DLC connection. Kool!
When I started the engine, the gauge came alive. I got the diagnostics to display. I should read the Installation Instructions to figure out how to set up the gauge to display other items of interest......
Firmware has been updated, and configuration is underway.

Updated connector.
Zip ties hold each connector in place. The black section of wiring between them is a resistor that must be protected, and not allowed to flex or move around.

The cover/mounting pad for the AMG and EJK. The horizontal bar is the handlebar cross bar, so the instruments are below the handlebar cross bar and just above the handlebar clamps.
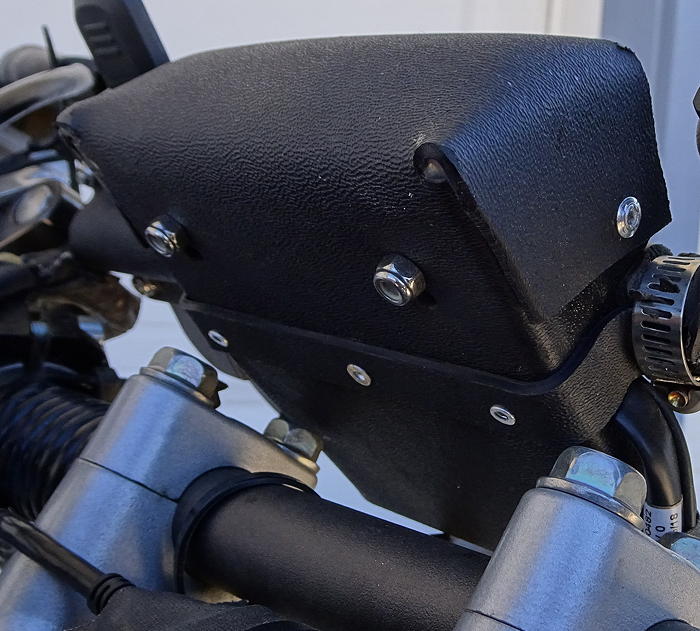
The mounting pad is held in place by the hose clamps on the Kydex strip mounted to the backside.
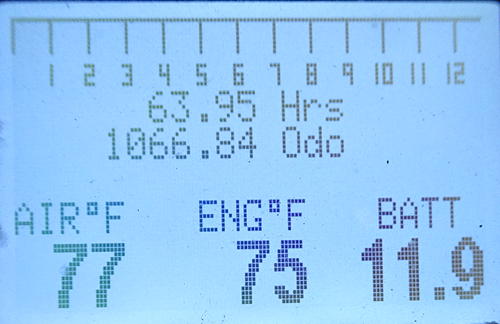
When you switch on the key, the display shows whatever View Mode you selected in the setup. I chose Speed+Rpm12. But Hrs and Odo are shown in the middle of the screen until you start the engine. These are my current values, after having calibrated the AMG.
The battery is reading a bit low because I have the ignition switched on and the engine is not running. I was setting up the camera and took a few test shots.

When you start the engine, Hrs and Odo go away. The large number is speed and the bar-graph is 12K+ RPM, as specified for the Speed+Rpm12 View Mode.
The RPM looks like it's about 1,455.
I often check the engine temperature, which runs in the 290-300 range. I ride a bit easier when it gets up to 300, just to see if I can get it back down to a lower number.
The battery is up to normal here.
I haven't shown the speed sensor hookup yet, because I'm doing a one-off install based on a very early design. 12oclockLabs has a final design that I will adopt soon.
Here it is, as shown in the YouTube video from Jeremiah Johnson: 12oclocklabs Mini Gauge
Suspension - forks and shock
Forks
Back-ordered fork parts from Honda are on the way to Bruce Triplett. He will do his magic on the damper rods, and possibly arrange springs replacements.
6/17/2019 - Bruce called; he has the fork parts and is working on the damper rods.
6/24/2019 - Bruce called; fork parts are in the mail...
6/27/2019 - The fork parts arrived today.

You can see the welded/brazed over holes....

Disassemble and clean the parts.
The new damper rods with Bruce's holes were installed with no problems encountered.
I took a little ride to check out the Bruce-modified damper rods. I rode about 51 miles, from my driveway to Herring Park and back to my driveway loop, starting at about 7,200 feet up to 10,300 feet. The route is dirt roads, nothing particularly difficult, just a 2.5 hour loop into my front yard mountains. As usual with dirt roads in the mountains, there were ruts, braking bumps, pot holes, mud holes, and in a few sections, embedded rocks. After the ride, I measured 6.5 inches maximum fork travel, so no big air on this ride.
By and large, the forks handled all comers, and I am very pleased with their performance. The stock rear shock still transmitted jarring BUMPS to my butt, and through the frame, to my arms, but the forks were very smoothly handling the front-end of the 250F. I expect even better performance once the shock is upgraded.
I may adjust fork oil height and/or change the fork oil weight, but these will be minor changes to match their performance to the new shock. As for now, I will ride with them as-is and wait patiently for the new shock's arrival.
In summary, the $70 Bruce damper-rod-mod was money well spent. The forks actually work exceedingly well for damper-rod forks. They suit my riding needs exactly.
|
CRF250F 2019 Forks |
||||
| |
Bruce |
Honda Service |
Measured |
Proposed |
Spring rate |
.39kg |
|
.41kg |
.41kg or .43kg |
Ideal spring rate |
.46kg |
|
|
|
Spring length |
35mm x 425mm |
420.6mm |
35mm x 425mm |
35mm x 425mm |
Spring spacer |
200mm |
|
200mm |
200mm |
Total length |
625mm |
|
625mm |
625mm |
Preload |
5mm |
|
5mm |
5mm |
Ideal race sag |
1 3/4 in |
|
2 3/8 in |
? |
Fork oil |
Syn motor oil |
Pro Honda |
Ugly |
AMSOIL |
Oil level |
130mm |
94mm 3.7in |
110mm 4.3in |
125mm ** |
Oil capacity |
|
630cc |
600cc |
600cc |
Fork travel |
216mm 8.5in |
216mm 8.5in |
216mm 8.5in |
216mm 8.5in |
* mixed #5 and #10 in equal amounts. |
||||
** I did not get all the air out, so this number needs to be re-checked. |
||||
Fork bleeders
I'm gonna drill and tap the fork caps myself. How hard can it be?

Getting all the parts together...
The smaller fork caps are for stock CRF230F forks.
I'm gonna do them first, for practice.

It wasn't hard at all. I practiced on one small cap only.
Removed the unmodified fork caps, and ready to install the modified ones.
Fork sox
I don't like fork boots.


Shock
I wanted to remove the rear shock to get some measurements, and to see if a Fox PodiumX shock for my CRF230F would fit the 250F. Sure would be convenient if one shock fit both bikes. The procedure from the Honda Service Manual to remove the shock is to remove the following:
Brake pedal
Battery box (only 2 bolts, after you remove the battery and half of the wiring and other junk)
Fuel tank shroud (already off)
Shock arm-to-shock link nut and bolt
Lower mounting nut and bolt (shock absorber)
Shock arm-to-swingarm nut and bolt
Shock arm
Shock link-to-frame nut and bolt
Shock link
Upper mounting nut and bolt
Shock absorber
Reinstall is the reverse of above.
Whew, I thought it would be a lot harder than that!
Are you kidding me?
I will remove and replace the shock exactly once, when I install its replacement. Which I will buy from Race Tech.
Just for grins, I did measure the stock shock and the Fox lengths:
Stock 250F 14 3/8 in
Fox 230F 15 3/8 in
(CL on mounting bolt holes)
Too bad I can't use my spare Fox PodiumX shock; it's a very nice unit on my 230Fs.
I ordered and received a brand new Honda stock shock from RonAyers.com. I talked to Tech Support at Race Tech, and confirmed that they can build me a G3-S custom shock with IFP (Internal Floating Piston - Internal Reservoir, No Compression Adjust). I bought one of these custom shocks for my 2013 CRF250L and it worked great, so I'm expecting similar results for the CRF250F version. This is a bolt-on no-mods replacement, so minimal effort. That is, if you don't count the shock removal and reinstall effort described above!
6/13/2019 - I shipped the stock shock to Race Tech today, so they can get measurements etc needed for the build.
6/18/2019 - Race Tech has my stock Honda shock, and the G3-S guys are starting work on my new shock.
6/26/2019 - My new G3-S shock is in the mail...
7/1/2019 - My new G3-S shock arrived today.

Stock on the left; Race Tech on the right.
The Race Tech is about 1 pound 7 ounces lighter.
Installation...grrrr (see above lengthy procedure). I was able to skip a few steps because I've done this lots of times on many motorcycles, and I've discovered a few shortcuts. It was still a tedious process.
All suspension bolts not previously encountered during the KoubaLink install were dry. Just like the previous ones. Poor QA/QC at the factory. Grease 'em.

It's in there. I like the blue spring.
The upper locking ring-nut is loose so I can set the sag, then I'll tighten it.
My ride loop for the Race Tech G3-S shock test was the same as the ride to test the forks: a loop ride to Herring Park and return. The roads were in the same condition as the previous ride: ruts, braking bumps, pot holes, mud holes, and in a few sections, embedded rocks.
If I had to use one word to describe the ride, it would be smooooth. For the most part, I didn't feel the braking bumps. I did feel pot holes and mud holes but definitely not much. I could feel the embedded rocks, but there were no jarring impacts, just smooth ride-overs and go. G-outs were a pleasure - no panic feeling, just drop in and rise out. The whole ride was so much better than previous trips, it was like I was riding a different bike. The $800+ was money well spent, and I would even say cheap at twice the price.
Now let me tell a short story. When I first rode the bike, excitement masked any negatives I might otherwise have noticed. But as I rode more and more, I began to notice the poor suspension and resolved to fix that area. So the forks and shock were put on the makeover list.
But there was something else that was bothering me about the bike. I noticed a thump or whack in the area under the air box and lower. This noise felt and sounded like a loose chain. So I started adjusting the chain tighter to take up slack. This is when I discovered that the Kouba Link install had changed the amount of chain slack needed. So I did the procedure to find out the proper chain slack amount for the Kouba Link install, as described HERE.
The noise didn't go away. So I looked at the chain itself and discovered it was kinking, even after correct slack adjustment and copious amounts of chain lube. I replaced the stock chain with a DID VT2 chain, my current favorite chain on my 230F motos.
The noise didn't go away. I checked the kick stand to see if it was flopping around. No dice - it stayed firmly in place over all bumps and g-outs.
I checked the swing arm for loose bolts. I checked the chain guide. All bolts were fitted and tightened correctly.
I checked the frame, but it showed no damage anywhere.
Puzzled, I rode on.
I installed the modified fork damper rods. The forks were fine, but there was no change in the rear, still noisy.
On today's shock test ride there was NO NOISE from anywhere below and behind the airbox. The bike was silent as I glided over bumps and raced along the dirt roads. The only sound I heard was the thump-thump of the engine.
After thinking on it a bit, I have come to the conclusion that it was lack of rebound damping in the stock shock that caused the noise. The shock would compress over bumps, and then rebound with a bang!!!
You don't know how happy this makes me. There is nothing wrong with my new bike - hooray!

On the way to Herring Park.
Yes, one fork sock is missing; I'm checking maximum travel by measuring the dust line.
Stock Honda CRF250F shock - about $162. Ron Ayers
Race Tech G3-S Custom Shock - about $800. Race Tech
Front forks damper rod changes - about $70. Bruce's Suspension
Shock Sox Fork Seal Guards 37-50mm Fork Tube 13" Black - about $27. Rocky Mountain ATV MC
Motion Pro 11-0095 Silver M5 x 0.8 Micro Bleeder - about $15. Amazon
Bags
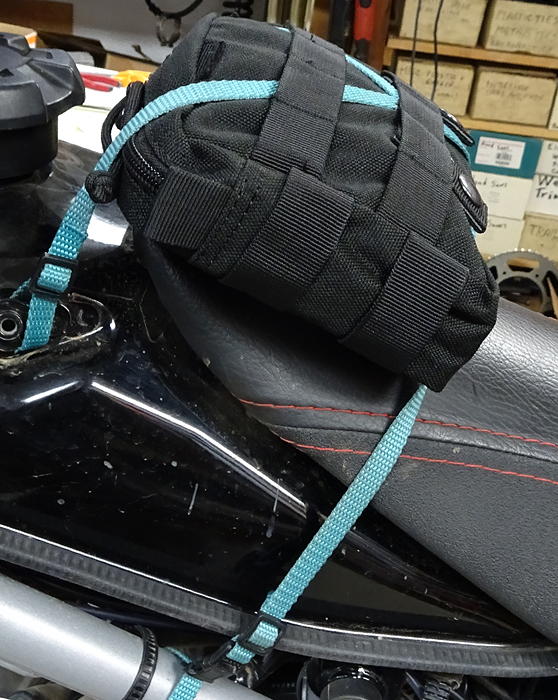
Tank Bag. The teal straps will be replaced with black ones.
Contents: Motion Pro mini tool kit, nuts/bolts assortment, ARC Back Country gloves, Smartwool Merino gloves as liners,
Mini first aid kit, microfiber cloth, one other thing.

Rear seat/fender bag.
Contents: Klim Revolt Windstopper Pullover and xxx waterproof jacket (shell).


AMYIPO MOLLE Pouch 7"×5"×1.5" Multi-Purpose Compact Tactical Waist Utility Pouch - about $11. Amazon
Stearns ATV bag - about $12. WalMart many years ago.
Fuel Tank
In August 2021, I bought the XCELL plastic fuel tank from Olimotos, a dealer in Brazil. This tank is slightly larger than the stock tank; Honda CRF250F - Fuel Tank Replacement

Spare Parts

As mentioned previously, it's a long drive to the nearest Honda Dealer, so I order spare parts that I'm likely to need, short of a complete engine rebuild.
That $41 spark plug is an expensive spare, but if the one in the bike quits on me, I gotta have a spare handy.
Footpegs? Hit a big rock in the trail and I can limp home and replace it, to ride the next day. Same goes for the chain guide.
Air filter? Yep, gotta have a clean and oiled air filter on standby.
Big Bore kit - pending
Project for a rainy day
Do you understand Portuguese?

CRF 250F Melhorias de performance / Cilindrada / Comando / Cabeçote
(CRF 250F Performance improvements / Displacement / Control / Head)
Seat Concepts - seats
They have seat covers/foam kits; several colors.
|
Manufacturer labels and stampings
|
Parts are listed in the same order as the main body of this page i.e. roughly the order of installation.
Prices are rounded up to the nearest dollar.
Total cost $3,029 (2020 prices)
Parts removed