
Honda CRF250X - Sold with these modifications
October 30, 2017 version
|
My Modifications |
|||
|
|
Honda CRF250X - Sold with these modificationsOctober 30, 2017 version
|
I modified my 250X in a vain attempt to improve upon Honda's design, always telling myself that my mods were just personal preference.
In reality, I was gratifying my urge to express a rather mediocre engineering skill.
Over the years, mods came and went, and this page represents the 250X as sold in July, 2017.
The mods are in alphabetical order, not in the order I did them.
Alphabetical table of contents
Weigh-in
The first thing I did when I got my 250X home was empty the gas tank and weigh the bike. It weighed 236 pounds. The bike was stone stock, no mods. All fluids checked and topped up, and the gas tank was empty.
Note - the 250X now weighs 249 pounds with all mods and an empty gas tank. My mods added 13 pounds.
Air box
The picture of the airbox below shows the cast-in 'raised cut line' as described in the "Closed Course Competition Modifications" bulletin (click to supersize). I have drawn in a red line along part of the cut line to show where the line goes; it's much clearer when you see it yourself. I cut out some of the air box top (3 1/2 x 3 1/2) but not as much as described in the CCC bulletin (4 x 7); see my cuts in the lower picture. I also removed the wire screen in the filter cage, but others who did dyno testing have shown that removal of the screen does nothing for performance.
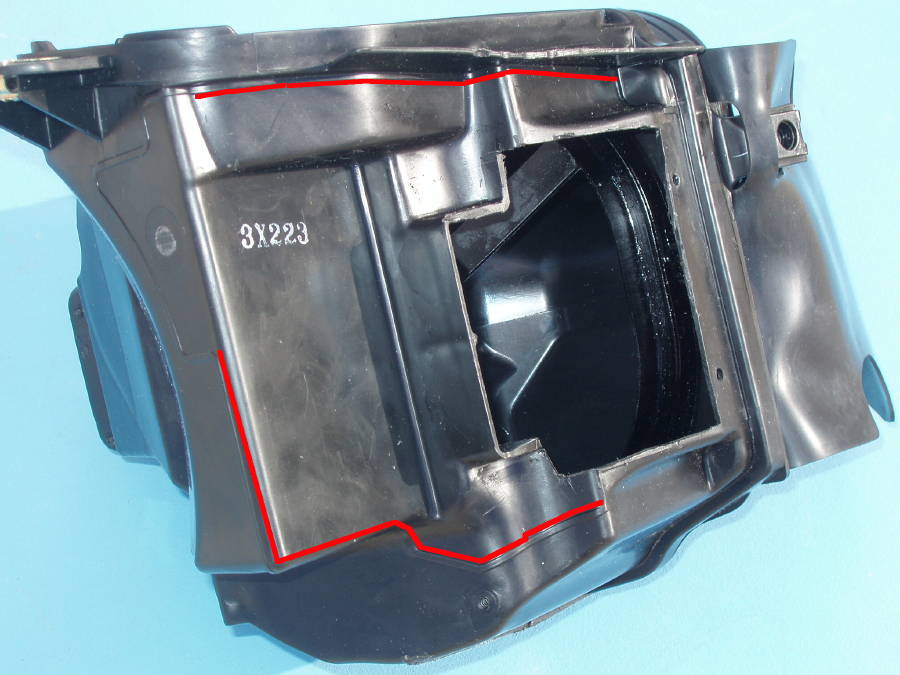

Note: On my way to getting the air box out of the frame, I discovered the joys of sub-frames. I've never owned a bike with a sub-frame, and I never knew what I was missing. I had to raise the sub-frame to get the airbox out. The Service Manual says to remove the muffler from the exhaust header when you're removing or pivoting the sub-frame. I didn't want to take a chance on ruining the gasket where the two join, so I left them connected and, after removing the muffler mounting bolts, I strung a wire to hang the muffler from my garage door opener hanger bracket. The muffler hangs while remaining connected to the exhaust header pipe and the sub-frame pivots and comes off easily.
Battery

The stock Yuasa battery was replaced by a larger capacity Yuasa battery many years ago - the CRF450X '05-'08 YTZ7S battery. The 450X battery is a 6 amp hour battery and has 130 cold cranking amps vs 4 AH / 79 CCA of the 250X battery. It's a teeny bit smaller (1 mm each dimension) but weighs about 1.1 pound more.

Prior to the sale, I replaced the battery again, this time with an Antigravity Lithium Nano-Phosphate 8 cell battery. This battery is much smaller and lighter than either Yuasa. I added a pigtail to the battery terminals to facilitate trickle charging. The pigtail tucks in behind the frame nicely.
Brake line
When I lowered the triple clamps and shortened the handlebars, the front brake line looped high above the handlebars, so I replaced it with the CRF250R front brake line; it's a perfect fit.
In the picture below, I have temporarily mounted the longer X brake line alongside the R brake line to show how much higher the X brake line loops up. The R brake line has the two pieces of gray tape wrapped around it, taping the odometer wire (since removed) and brake line together.

The X brake line is about 6.25" longer than the R brake line.
Notice that I don't have an odometer or other gear in the middle of the area that the brake line passes over. If you use the stock odometer, it may get in the way.
Carburetor
I checked the stock main and pilot jets and the needle; they matched the service manual. After looking at some jetting notes that others had posted, I changed the main to a 128, the pilot to a 42, and the needle to clip position 4. I installed a T-handled extended fuel screw set to 2 1/4 turns out from bottomed lightly. It's a brass screw made specifically for the 250X to clear the starter motor. The fuel screw is sold by KoubaLink.com and you can also get them at CRFsOnly.com. I put the carb back together and installed it back on the engine. It sure was a tight fit!

Note - I have not had to change any jets since the original modifications. I turn the fuel screw in and out as needed for temperature changes, but otherwise no changes have been necessary. I did add the Merge Racing AP spring.
Carburetor float bowl replacement screws
I replaced five carburetor float bowl phillips screws with stainless steel hex-head screws (allen-head). That way, I only had to deal with getting the phillips screws out once (I usually bung them up). Another benefit is that you can actually remove the float bowl without taking the carb off the bike because the hex-head screws can be removed with an angled wrench after tipping the carb sideways. I did not replace the accelerator pump screws.
Idle-adjust bracket - replace stock screw with M4x10 and M4 lock washer.
Float bowl - replace four stock M4x14 screws with M4x16 screws (no one seems to stock the M4x14 in stainless) plus M4 lock washers. If you don't use lock washers, one of the M4x16s will not fit; use an M4x12 instead.
Carburetor overflow and vent hoses

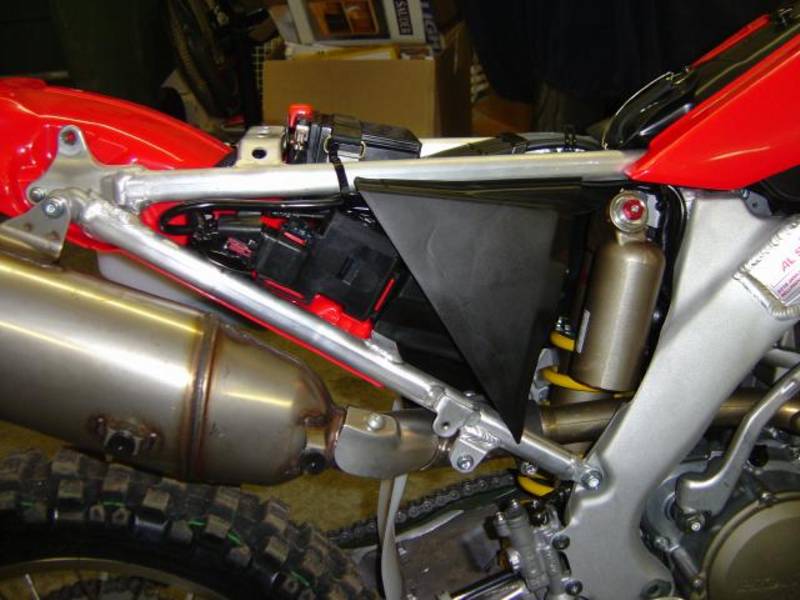
There are four vent hoses and one drain/overflow hose on the stock carb. In the stock configuration, these are gathered into a bundle and routed behind the tranny and downward. This was not acceptable to me. I changed the hose routing several times over the years, and finally ended up with this configuration. Two vent hoses leading to the airbox are not shown in this picture, but see below.
The drain/overflow hose connects to the bottom of the carb and runs downward. I put the end of the hose into a piece of air filter foam. It is held in the foam with a short piece of wire through the hose and foam. I put the end of this hose under the transmission and on top of the skid plate. Any overflow fuel will spill onto the skid plate and evaporate. The foam prevents debris from getting into the open end of the hose.
I rerouted the four carb vent hoses to prevent air locks from affecting fuel flow in the carb. For instance, in a water crossing, water can plug the vent hoses and prevent the smooth flow of fuel out of the carb float bowl and into the carb throat. Keeping the ends of the vent hoses clear and open allows proper carb fuel flow.
Two vent hoses connect at the upper left and right sides of the carb at the T-junctions built into the carb. They run downwards. I connected both to a T-fitting, and ran the single hose downward. I put the end of the hose into a piece of air filter foam. It is held in the foam with a short piece of wire through the hose and foam. I put the end of this hose under the transmission and on top of the skid plate. The foam prevents debris from getting into the open end of the hose.

Two of the vent hoses connect at the upper left and right sides of the carb at the T-junctions built into the carb. They loop above the carb before running down behind the transmission. I routed these hoses to the open top of the air box on the theory that vent hoses only need to breath, and so no actual fuel will be coming out of them (except under dire situations, like bike upside down off trail).
I added DuBro filters to the hose ends. The filters come in two sizes. I used two of the smaller size. I put some air filter foam inside each, pushed them onto the hoses (they're a tight fit, so no hose retainer was used), then zip tied the hoses so they ride at the top left rear of the airbox. I tucked the ends of the filters under the hose and frame in the area.
Clutch cover problem
A 250X rider fell over and ended up with a hole in the clutch cover. The culprit: the brake pedal serrations. So I decided to grind a few teeth off my brake pedal.


I spent quite a bit of time looking for clutch and ignition cover protectors. One company makes them for DRZs and a few other bikes, but no one makes anything for the CRFs. So I went looking for a replacement clutch cover.
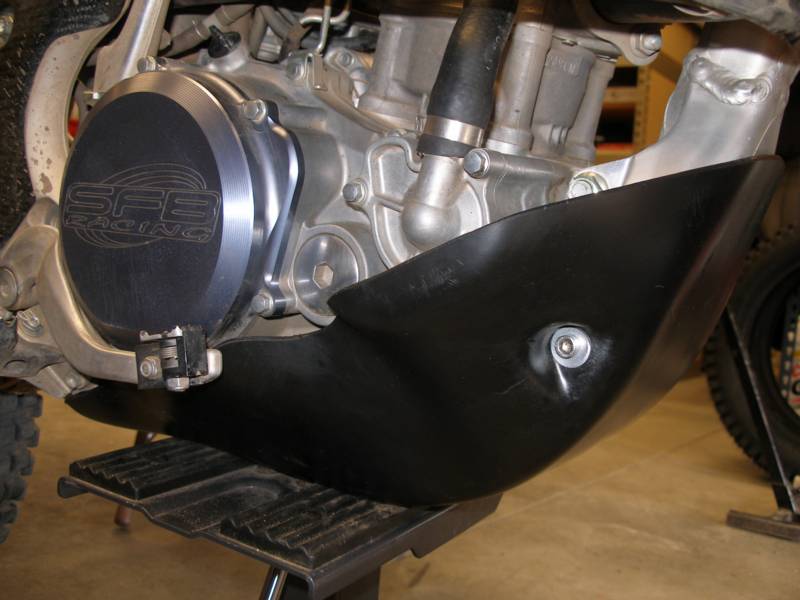
After looking at the SFB, Hinson, and Rekluse aluminum clutch covers and the Lightspeed carbon fiber clutch cover, I decided to go with the SFB. The new cover is larger and heavier than stock, but the added protection is reassuring.

Stock (left) 120 grams, 27mm deep
SFB (right) 214 grams, 28mm deep
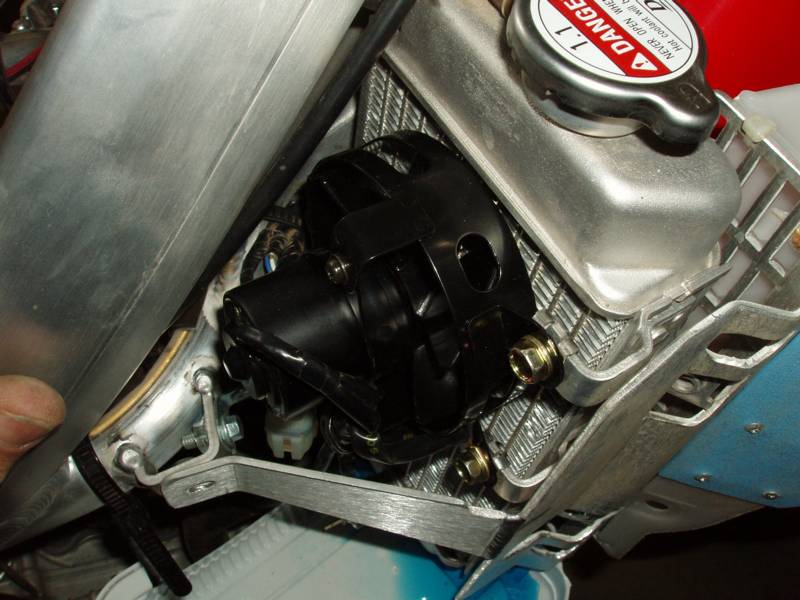
Cooling fan

The Honda part description and part number for the '04 and '05 fan kit is:
Fan set, cooling 19000-KSC-000 - '04, '05
11/1/04 - I waited all summer for Service Honda to call me and tell me the Cooling Fan Kit was finally here, but they never called. I was hoping to get the cooling fan kit so I could install it when I installed the big-bore kit - for insurance against overheating.
I contacted a few riders in England to see if they could help, but after checking around, they said that the kit was nowhere to be found.
Finally, after a long evening of googling, I located a reputable Honda dealer in Rugby, England. Yes, that rugby - where the game was invented. The dealer's name is Nightingales of Rugby.
Using their web site, I sent them an inquiry asking about the kit, and the very next day I got a price quote via e-mail! I called them to make sure we were talking about the cooling fan kit for the CRF250X, part number 19000-KSC-000, and yes, they confirmed that they could get me one. So, I sent them an e-note ordering the kit and included my mailing info. I followed up with another call to tell them my VISA number. One week later, I got this in an e-note "On its way to you. Total price with post £146.27. Should take 3-7 days." and about fell out of my chair. I don't get service this good from many companies in the US. Six days later, the postlady rang my doorbell and handed me a package shipped via "Royal Mail" - it was the cooling fan kit. I tore open the small box to find an even smaller box inside: an official Honda parts box. Inside was the kit. I weighed the entire kit on my super accurate scale - 14 oz. Wow.
So, quick as a wink, I set to work and installed the cooling fan on my 250X according to the instruction sheet included with the kit.

You have to remove the seat,
radiator shrouds, and tank to get to the innermost mounting tab
and the wiring. There is an existing plug taped to the wiring
harness. Remove the tape and reposition the plug. You must remove
the protective end-cover before plugging in the fan.
I was able to get the radiator plug out and the thermostat in without loosing too much Engine Ice. It helps to leave the radiator cap on to hold the liquid in the radiator somewhat. The thermostat takes a 22mm wrench. The fan and shroud went on without a hitch.
I reinstalled the tank, shrouds, and seat. I topped up the
radiator, turned on the gas, pulled the choke, and started the
motor. It runs! The motor, not the fan. We had snow here overnight,
and it was a bit chilly out this afternoon, so I had to be creative
to get this engine to overheat. I parked my bike in the garage
door with the exhaust outside and the engine and radiators inside.
Inside the heated garage. After a few minutes, the temperature
on the Racetemp strip started climbing. At about 204 degrees F,
the cooling fan came on. The temperature immediately started back
down. Soon the fan went off. Success! It was neat to see the fan
whip on; it spins pretty fast.

The fan fits fine with the Flatland radiator guard. I had no problems installing the kit; it took about 30 minutes.
All summer, I have never had my 250X overheat to the point of the radiators bubbling into the overflow tank. I usually keep an eye on the Racetemp strip, and I've never seen it over 190 degrees F. So, you might question the wisdom of installing a cooling fan. Well, I don't know how much more heat the 270 kit will produce, but I think the fan will handle the heat. And, I like the idea that the fan will kick in whenever I get pokey on the trails.
I can't believe how easy it was to deal with John at Nightingales and how quickly the kit arrived. I am very satisfied. PS I paid full retail.
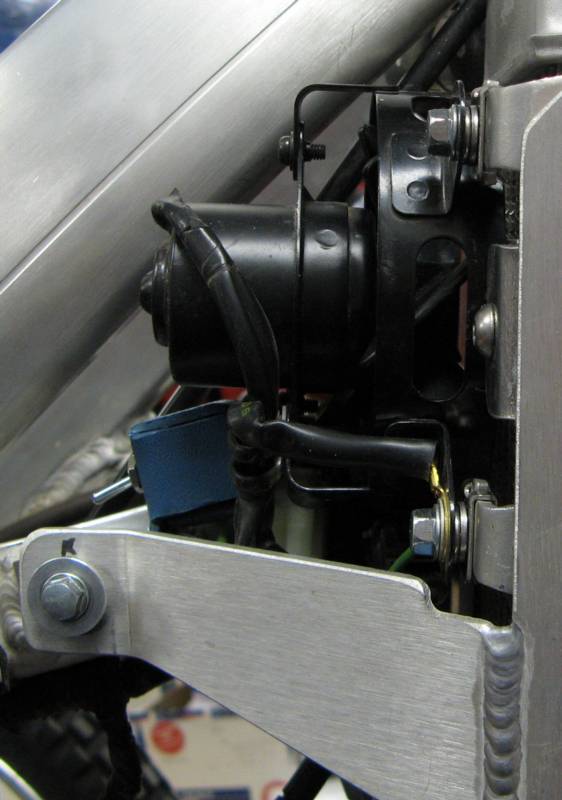
4/4/07 - I switched from Flatland radiator guards to modified Moose guards and had to relocate the cooling fan/shroud. I added two washers (one lock, one flat) to space the fan/shroud away from the Moose rear brace. I also switched to slightly longer mounting bolts on the fan shroud. Everything fits fine, and I'll test it out on a tight trail when we get some warm weather.

|
|

|
DualSport - Cheep!
I installed the absolute minimum amount of equipment that I could get by with and still be street legal (after all, I did sign the affidavit!). The PIAA bulb and StonGard Headlight Shield are not legally required, but they are very valuable additions for safety and protection.
____________________________________________________
DS - Headlight hi-lo switch
 The first item is a high-low beam switch for the head light. The stock bulb is a dual filament bulb; all you need to add is a switch and extra wires. Use a small, center-off toggle switch and you'll have off, low, and high. Radio Shack 275-325, about $4.
____________________________________________________
DS - Extreme white headlight bulb
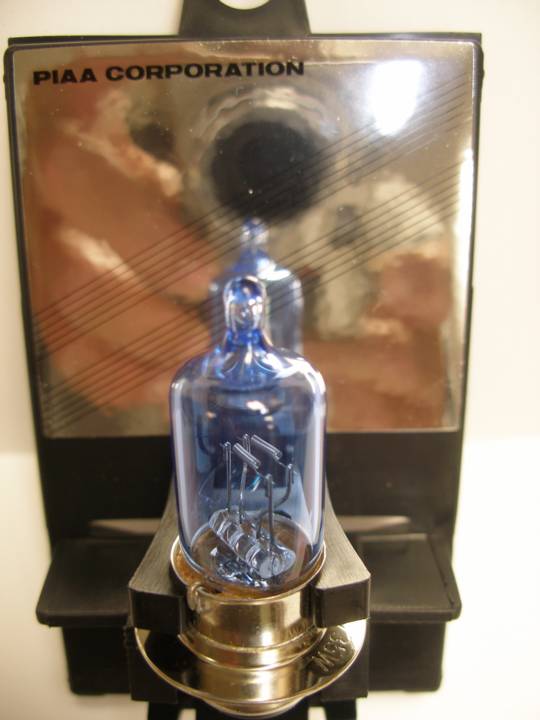
I stumbled upon a great item one night while cruising eBay - extreme white, low-wattage headlight bulbs made by PIAA. These very trick bulbs are ultra bright and draw very low current, about the same as a stock bulb (2.9 amp). This 35W/35W H6M bulb fits the stock socket. Although this bulb is not required for licensing the bike, it is a welcome addition if you plan to ride at night. PIAA bulbs are sold on eBay for about $29.00 each, sold 2 at a time only. Chaparral has them for $27, sold individually. CRFsOnly has them for about $29 each.
 The pictures don't show the intensity of the PIAA bulb so well, but they are bright white!
____________________________________________________
DS - Headlight shield

If you're going to spend all that money on a PIAA bulb, you might as well protect it. Aerostich sells the StonGard Headlight Shield, a 12" x 12" sheet of 80 mil thick clear vinyl from which you can cut a piece to fit the headlight lens. You have to look carefully at the pictures to see the protector. Part number 3569, about $18, but you'll have a lifetime supply!
NOTE: this material should not be used on headlight lenses smaller than 5" with over 80W bulbs; a thermal crack may ensue.
____________________________________________________
DS - Taillight/brake-light
DRC makes a direct bolt-on replacement for the stock LED taillight. The DRC light looks exactly like the stocker, except for a missing foam strip. The DRC is brighter, draws less current, and includes a brake-light lead. Adding a rear hydraulic brake-light switch makes the package almost complete. The only thing missing is the white license plate light, but I don't think anyone will notice.
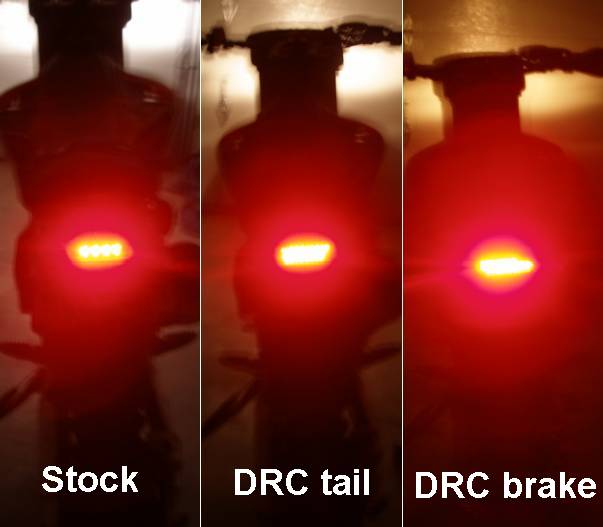
DRC products are sold by MXSouth and CRFsOnly.
____________________________________________________
DS - Horn
Many riders use squeeze bulb horns, but I wanted something tricker. I finally found a battery powered unit sold at bicycle shops. This horn is loud (105 db) and weighs about 3 oz, not including the 9v battery. At 1.5" x 2.5" x 2.75", the horn is not small, but I found just the right spot to mount it. I got my horn at Sunrise Cyclery for about $24.98, free shipping.

My thumb is on the horn button; my finger is resting on the horn itself.
____________________________________________________
DS - Mirror
I installed a small Acerbis fold-away mirror.
____________________________________________________
DS - License plate mount


I made a mount for the license plate. I decided it would look best if the plate was just below the led taillight, so I trimmed the rear fender. I think it came out ok.
____________________________________________________
DS - Fender flares

I mounted some rear fender flares to keep mud off my backside.
Engine vent hose (aka valve cover vent hose)
The engine vent hose is connected to the valve cover vent at the top of the engine. From there it runs back and down, then branches at a T fitting. One branch runs to the front of the air box, on the engine side of the air cleaner (see filter installation below). The other branch runs down to the rear of the transmission and into a wire retainer. There is a plug in the transparent end of the hose.
If you see fluid inside the hose, slip the hose out of the wire retainer, remove the plug, and drain the fluid. Note the front and rear wire loops on the retainer are open on different sides.
____________________________________________________
Valve cover vent hose filter
I removed the valve cover vent hose from the carb intake boot and added an air filter. Someone on ThumperTalk pointed out that hot oily air feeding into the carb was probably not the best setup.

I bought a small breather filter at Autozone for $2.49 and a 3/8" plastic barb from True Value for $1.10. I found a 1/2" plastic plug in my box 'o plastic junk.

Here's a short description of what I did.
Disconnect the hose from the airbox, and remove the plastic coupler and hose clamps. Push the 1/2" plastic plug into the carb boot opening.

Cut 1/4" off of the filter tube so it will fit under the seat easier.
Push one end of the barb into the filter tube.


Push the barb/filter onto the hose.
Tuck everything up under the seat.
Exhaust diffuser '04-'07
The exhaust was way too noisy with the exhaust diffuser removed and too restrictive with it installed. I modified the exhaust diffuser by drilling an 11/16" hole in the inboard end. The exhaust now has a pleasant note but is still very quiet. Remove the torx bolt at the rear of the muffler to remove the diffuser. The diffuser shown fits the '04-'07 muffler; the '08 and newer diffuser is welded in.

See also: CRF150F, CRF230F, and CRF250X Diffusers
Exhaust pipe guard
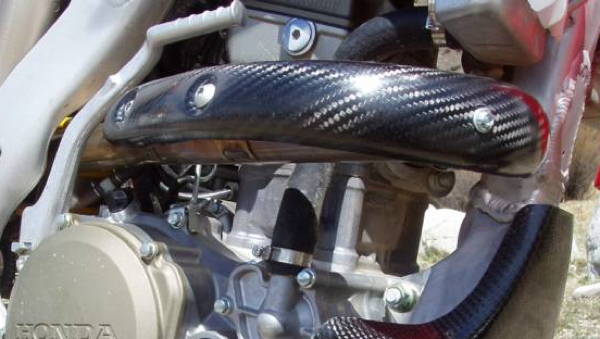
I installed some E-Line carbon fiber parts, but eventually removed them all except the exhaust pipe guard.
Fork air-bleed valves - STR


Fork Seal Savers
 I finally found time to install the fork seal savers.
Handlebars, grips, and handguards

I trimmed a set of Pro Taper standard diameter CR-mid handlebars and installed new Spider SLX grips (from BRP) on the handlebars and throttle tube, then swapped out the Renthals for the shiny aluminum Pro Taper SEs. The Spider SLX grips have a soft outer layer and are smaller in diameter and slightly longer than the Honda grips. I trimmed the ends to shorten the grip slightly (usually I keep the donut ends and just cut out the centers). The Wacker handguards went on easily. I didn't have to cut off the levers.
I swapped the start button to the left side, just like my 230F. The wires are just long enough to reach behind the headlight where they connect into the wiring harness.
Ignition switch

I installed a keyed switch from a CRF230F for ignition control. The stock clutch interlock switch must still be activated by pulling in the clutch before starting. The only thing different is that the ignition key must also be on. When the ignition key is off, the bike won't run. This allows me some measure of security when I park the bike outside stores and restaurants in rural CO.
There are two circuits on the switch. One circuit is open when the key is off and enables/disables the electric starter. The other circuit is open when the key is on and grounds/ungrounds the ignition, just like the kill button. You can install either circuit or both for complete protection.
There are four wires connected to the switch: three male and one female. The green-male and black/white-male are the open-when-off pair; the red-male and black-female are the closed-when-off pair. All wire connections are made to the wires behind the headlight nacelle.
Look among the wires behind the headlight nacelle. Find the black/red wire that connects to the clutch interlock switch. It's easy to find; it's the only wire that has a simple pull-apart junction. Pull the wires apart. Connect the red-male switch wire to the female lead and then connect the black-female switch wire to the male lead. This switch circuit is open when the key is off, so the starter button (in series with the clutch switch) will not work until the key is turned on.
Next, find the black/green and black/white wires that connect to the kill button. Cut off the short 2" sleeve covering the wires. Splice the green switch wire to the black/green lead and then splice the black/white switch wire to the black/white lead. You are wiring a parallel connection with this circuit. This switch circuit is closed when the key is off, so the engine will not run until the key is turned on. This also prevents the kick starter from starting the engine.
For splicing, I used tap-in squeeze connecters, which have a metal blade that cuts through insulation. The connector has a pass-through channel for the lead that is already there. There is also a dead-end channel for the lead that you are splicing in. You can cut off the male ends on the switch wires and splice them directly into the squeeze connectors. If you want a disconnecting splice, then make a short wire lead with a female connector on the end and splice this into the squeeze connector. The female connector on the end mates with the male end of the switch wire. The female connectors I bought didn't fit tightly; I had to crimp the barrel slightly to get them to work.
2 - tap-in squeeze connectors Radio Shack 64-3053
2 - female connectors RadioShack 64-3085
2 - 3" pieces of #18 stranded wire
Keyed ignition switch considerations
I had planned to remove the clutch interlock and use a keyed switch to enable/disable the start button, similar to my 230F. After a little thought, I decided this was not a good idea. With this setup, if you accidentally bumped the starter button while riding, the starter would engage. This doesn't happen on my 230F because it has a neutral interlock and a clutch interlock. The 250X does not have a neutral sense wire. So I decided to keep the stock clutch interlock.
Lowering the seat

For my first effort to lower the seat height, I installed a Kouba Link to lower the rear of the bike 1.75". I also lowered the front: I added washers to the handlebar clamp mounts to raise the handlebars, and then I lowered the triple clamp 3/4 inch below the top of the upper fork tubes. When I did this, I noticed that the upper fork clamp bolts were lower than the inside threaded portion of the fork where the damper assembly screws in. So, I used the same torque as for the lower clamp bolts, 14 lb-ft.
Both mods together resulted in the low spot in the seat dropping 1 3/4 inches.
I set the rear suspension sag at 4".
Eventually, I spent a tidy sum to have the forks shortened; see 'Forks - shortening' below.
_______________________
I think that adding more washers or a larger spacer to space the handlebars higher and allow the triple clamps to be dropped lower is a bad idea. The forks are tapered in the area between the stock clamping positions, and if you get too far away from the stock position, you'll be in the tapered area, and the triple clamps will not get a good grip on the forks. Ideally, the forks should be shortened the desired amount using an internal spacer, and then mounted in the triple clamps in the stock position.
Forks - shortening
Jeff Slavens shortened the front forks 1.5" by installing travel limiters on the damper rods. This matches the 1.75" lowering of the rear end pretty closely. Jeff also installed a set of softer springs (.38 kgf/mm) and revalved the forks by changing the shim stack (he will not reveal details, so don't ask). Note: Jeff no longer works on Honda forks.
I installed the forks in the stock mounting position in the triple camps, fork tube top flush with the upper triple clamp edge. I torqued the upper clamp bolts to 16 lb-ft and the lowers to 14 lb-ft, which are the stock values.
The low point of the seat is now at 36" when the bike is unladen and the bike has settled to its static sag resting spot.
The wheelbase is now 58"; stock is 58.4". This makes the bike more agile in tight situations, always a plus when riding tight trails.
I prefer using the shortened forks versus lowering the triple clamps on stock forks because the forks are now clamped more securely, and there is no possibility of the wheel hitting the fender. Yes, I lost 1.5" of travel, but the remaining 10.5" are more than enough for a trail bike.
When I rode the 250X after installing the shortened forks, I couldn't believe the difference. With the bike now level and the wheelbase a bit shorter, the bike turned crisply and with ease. Previously, the front end was always pushing in the turns, and I was always tense, waiting for a fall. This very bad tendency completely disappeared. The leveled bike now rides like Honda designed it (maybe a bit faster turning because of the lowering).
I cannot stress how important it is to lower both ends of the bike the same. If you go with a KoubaLink, then have someone shorten the forks also.
Note: Jeff Slavens no longer works on Honda forks. Too bad; his work on my forks was outstanding.
Odometer
I installed the TrailTech electronic odometer and used it for several years. I removed it before I sold the bike.

When I installed the TrailTech, I removed the stock mechanical odometer and the odometer cable. I covered the cable connection with a plastic cap. It looked ok.
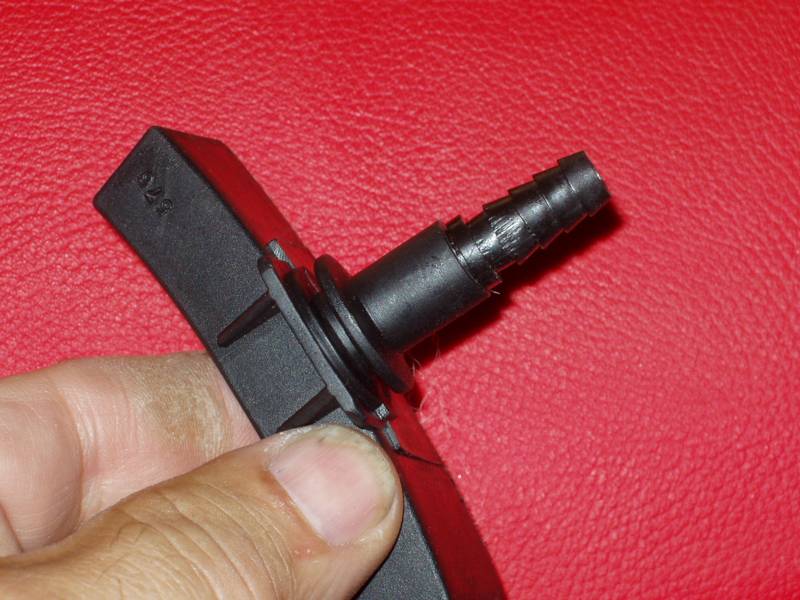
A month later, when I changed the front tire, I promptly broke the stock mechanical sending unit. I incorrectly installed the sending unit onto the wheel hub and crushed the plastic insides when I tightened the axle nut. DUH.
I pressed out the metal tube from the sending unit, so I could use it alone, without the rest of the now-broken sending unit. The tube has a cast-in 4-sided nut that promptly broke the plastic that was holding it into the sending unit when I pressed it out. No worries, the plastic was broken already.
![]()
![]()
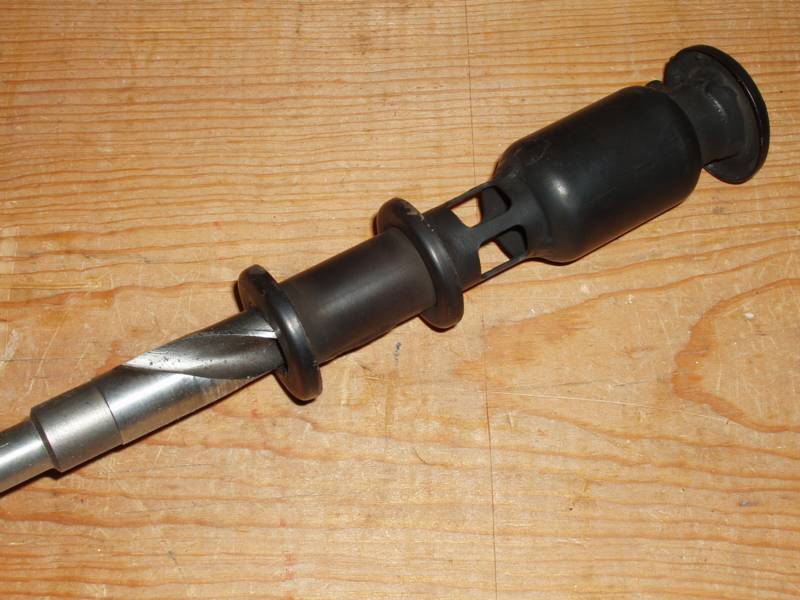
Eventually, I ordered the oil seal and collar from the left side of the wheel, and they fit correctly onto the right side of the wheel. The collar is 1mm longer than the tube from the sending unit, so the axle sticks out .5mm. But that's ok.
| Collar, left fr wheel | 44311-KZ4-J40 |
| Oil seal (26X37X7) | 91201-KS6-004 |
![]()
Left side collar on the left, pressed out tube on the right.
Radiator guards
I bought some Flatland Racing radiator guards because they were touted as the strongest. They look it! They also looked like they'd block air to the radiators, so I did some testing.
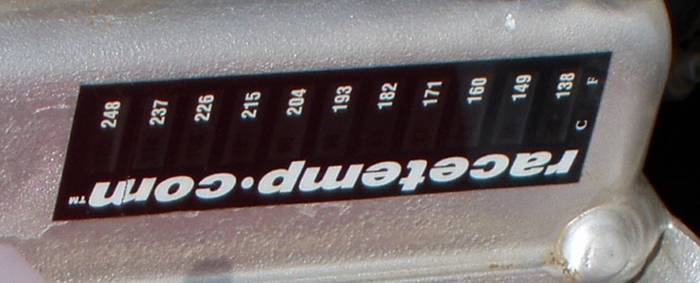
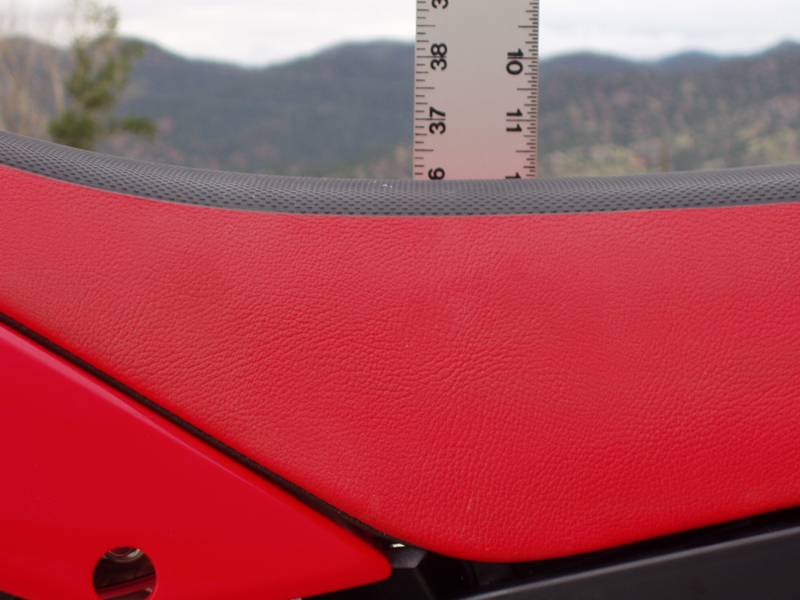
I bought some Racetemp engine thermometer strips. These are flexible plastic strips that you stick onto what you want to measure and read the temperature by noting where the strip turns green on the temperature scale. I put one strip on the top front of each radiator, so I could check each radiator's temperature. Although I am not measuring the radiator coolant temperature directly, I feel that the temperature I am measuring is a direct indicator of the coolant temperature in the various test conditions; i.e., if the radiator is hotter, the coolant is hotter.
The test route consisted of 1.5 miles on level ground followed by a one mile climb in 2nd and 3rd gears. The climb was not steep, but it was enough to raise the temperature a bit. I tried not to race or lug the engine; just ride it briskly up the hill. The ambient temperature was about 75 degrees, the humidity was high (it rained after I finished testing), and the elevation was about 9,200 feet. My 250X is jetted about as good as I can expect - crisp everywhere with no low-end bog or hanging idle. I'm using 13/53 gearing.
I tested the stock setup and the Flatland guards with and without the radiator grilles. I also tested some Red Line Water Wetter and Engine Ice engine coolant.
The numbers for both radiators turned out to be the same for each test, so I only show one temperature number (degrees Fahrenheit).
Stock - 160
Flatland guards - 170
Flatland guards w/grilles - 160
Flatland guards w/grilles and water wetter - slightly less than 160
Flatland guards w/grilles and Engine Ice - 150
I have no idea how these numbers relate to other situations, like enduro pace on tight trails, hill climbing, or racing at your local track. But I'm using them to justify my use of Engine Ice and keeping the grilles mounted.
When I told a mechanic friend about the poor showing for water wetter, he told me that I could expect no more than 2-5 degrees cooler on a motorcycle engine using it. The racetemp strips do not have a scale that fine, but the water wetter did drop the temperature a bit. You decide if it's worth the money.
The numbers indicate that the guards do make the radiators run hotter. This may be due to the grilles not being mounted more than any design flaw in the guards. The grilles must be removed from the radiators in order to mount the Flatland guards. But I found a way to mount the grilles to the front of the guards to restore the air flow and reduce the temperature.

When you mount the guards, you remove the two metal washers on the inboard radiator mounts because the guard does not require them. You'll have 4 washers left over. Mount two of the washers on the front fender bolts, between the fender and lower triple clamp on the rear two bolts. This tips the lower part of the fender away from the radiator enough to almost clear the grilles. You must also trim the three vanes on each grille on their lower ends for a final clearance fit.

Lastly, you must remove a square section from each grille, so the fork lower triple clamp clears at full lock. The picture gives you an idea of what to trim.

Mount the grilles with small zip ties, two at the top and two at the bottom. Make sure the outer angled vane stays aligned with the edge of the radiator and just hooks over it.

I was showing my 250X to a friend when he asked about the grille mountings. He observed that the stock setup had the grilles mounted flush to the vertical vanes on the inside of the shrouds and my mounting resulted in a gap. I rushed home and fabricated two air deflectors and mounted them post haste, but I still lost points as far as my friend was concerned ;-)
I emptied and flushed the cooling system before installing the Engine Ice. Engine Ice is a propylene glycol base engine coolant that is biodegradable, phosphate free, and non-toxic. It is premixed with de-ionized water, so you use it straight from the bottle - no additional mixing required. I paid about $17 for a 2-qt bottle of Engine Ice, and I think it's well worth the price.
________________________
The Racetemp strip kit holds three strips. I mounted the third strip on the top of the left radiator. I can glance at it while riding in slow sections and keep an eye on the radiator temperature.
See also cooling fan kit.
Reserve tank vent hose (aka overflow bottle vent hose)
The reserve tank vent hose runs from the reserve tank to the middle of the bike and then joins other hoses to run down behind the transmission.
If you see excessive coolant dripping from the hose, check the reserve tank to see if it is overfilled. If the bike is hot, there may be some normal overflow; recheck the fluid level when the bike cools down.
I ran this hose behind the transmission and on top of the skid plate. Any overflow will spill onto the skid plate and evaporate.
Shifter

I moved the shifter up one notch and replaced the shifter pinch bolt with a longer bolt and a lock nut.
Side number plates
Those who know me, know that I don't like number plates on bikes that I register for street use. They make the bike stand out too much. And they don't do anything for performance. And they just cost money to replace after you fall on them. So I always take the number plates off and make replacement covers, as appropriate. The 250X didn't need much, and I think it looks ok. Sort of the 'naked bike' look of road bikes.


The bike actually looks a little narrower than stock.
I also removed the metal tabs on the side of the muffler.
Side views - no mods

Skid plate - Hyde Racing
In August 2006, after installing a Hyde Racing skid plate on my CRF230F and being fairly happy with the results, I decided to get one for the 250X also.
The Hyde units are made of Teflon/Co-Polymer, which they say is a form of polyethylene. They're supposed to be plenty tough, and the 230F unit has held up well so far.
Mounting the 250X model was a little difficult. There are two mounting holes, one on each side, that line up with the stock wing guard mounting nuts. The Hyde unit is such a tight fit that I had to press rather firmly on the front and bottom of the skid plate to get the holes to line up.
The left side bolt went in ok. The right side was a problem. The bolt wouldn't easily enter the skid plate hole squarely and then engage the frame nut smoothly. USE YOUR FINGERS TO THREAD THE BOLT INITIALLY. If you use a ratchet or wrench, you may cross thread the nut.

The rear bracket went on without a problem; it has two smaller bolts, and the bracket fits over the frame easily.
The skid plate fits snugly with only one minor problem. There is no way to access the engine oil drain bolt and no drain holes in the skid plate, so I will have to remove it for oil servicing. It won't be too bad, there's only the rear mount and two front bolts. Piece of cake.
How does it work? Excellent. The Hyde is a much closer-fitting skid plate than the E-Line unit I had installed previously. It wraps around the frame and lower engine and provides more protection than the E-Line. I liked the E-Line, but I like the Hyde better. And the Hyde is just as quiet, maybe even quieter, than the E-Line. The Hyde is 4 ounces lighter than the E-Line. BONUS!
Throttle cable

I have always removed the push throttle cable from dual-cable throttles. I have never experienced a stuck slide due to high vacuum on the engine side of the carb slide.
After removing the cable, the pull cable needs minor readjustment. Plug the empty hole in the throttle cable cover with Shoe Goo or something similar. Plug the empty hole in the throttle drum cover on the carb with an M6x14 flange-head bolt with a locking nut on the inside.
The throttle operates almost effortlessly.
Transmission vent hose
The transmission vent hose is connected to the transmission vent at the top right side of the transmission. From there it runs a short distance upwards, then branches at a T fitting. One branch runs up to and through the upper engine mount plates and is open-ended. The other branch runs behind the transmission and downwards with all the other drain hoses; it is also open-ended.
If you see excessive oil dripping from the lower hose, recheck the transmission oil level.
I ran the lower transmission vent hose to the right side of the transmission and tucked one flap of the split end of the hose behind the spring on the rear brake pedal. This keeps the end of the hose high and open during most water crossings.
-fini-